How to Calibrate Equipment Correctly | 15 Critical Steps Most Technicians Miss
What Does It Mean to Calibrate Equipment


How to Calibrate Equipment Correctly Complete Professional Guide, Before anyone can follow a calibration procedure correctly, they need to understand what calibration actually means in professional practice not the textbook definition, but the working reality of what happens when you calibrate equipment. Calibration is the documented process of comparing a Device Under Test (DUT) against a certified reference standard under controlled conditions, identifying any deviation between the two, and either adjusting the instrument or documenting the error so measurements can be corrected. That’s the entire foundation. Everything else in this guide builds on that core relationship: DUT versus reference standard.
What makes calibration different from simply checking or verifying an instrument is the rigor attached to it. When I calibrate equipment properly, I’m not just confirming that a reading looks reasonable. I’m establishing a documented, traceable relationship between what the instrument reports and what the true value actually is and that relationship must be tied to a chain of standards that links back to national and international measurement references. Without that traceability chain, the calibration result is professionally meaningless regardless of how carefully the procedure was followed.
The reason this distinction matters so much in practice is that instruments drift. Every measuring device pressure gauge, thermometer, multimeter, analytical balance, flow meter gradually moves away from its calibrated accuracy over time due to component aging, environmental exposure, mechanical wear, and continuous use. Calibration is the process that detects that drift, quantifies it, corrects it where possible, and documents the result. An instrument that has never been calibrated, or one whose calibration has lapsed, is producing measurements of unknown accuracy. In any professional context where decisions are made from measurement data, unknown accuracy is unacceptable.
If you’re new to the concept and want a foundational understanding first, read our detailed guide on what is calibration before continuing it covers the core definitions that underpin everything in this article.
The Core Relationship DUT vs Reference Standard
The Device Under Test is the instrument being calibrated the one whose accuracy needs to be established or verified. The reference standard is the instrument used to perform that verification a device with documented, traceable accuracy that is significantly more accurate than the DUT. This is not optional. A reference standard that is only slightly more accurate than the device it’s calibrating produces unreliable calibration results because the reference’s own uncertainty overwhelms the measurement.
The professional rule governing this relationship is the 4:1 accuracy ratio the reference standard should be at least four times more accurate than the DUT. If the instrument being calibrated has a tolerance of ±1%, the reference standard must have an accuracy of ±0.25% or better. This ratio ensures that the reference’s uncertainty contribution to the calibration result is small enough to produce a meaningful, trustworthy comparison. Many high-precision calibration environments use 10:1 ratios for critical applications.
Why Calibration Is Not the Same as Adjustment
One of the most persistent misconceptions I encounter is the assumption that calibration automatically includes adjustment. It doesn’t. Calibration is the act of comparing and documenting. Adjustment is the separate act of correcting the instrument if it falls outside tolerance. A calibration may conclude with no adjustment at all if the instrument is performing within its specified tolerance limits and that’s a perfectly valid outcome. Documenting that the instrument was within tolerance without adjustment is just as important as documenting a correction. Both tell you something essential about the instrument’s performance and history.
Why Equipment Calibration Cannot Be Skipped
The consequences of skipping calibration or allowing calibration to lapse aren’t theoretical they’re operational, financial, and regulatory. Understanding why calibration is important is what drives every professional decision about calibration schedules, investment in reference standards, and the rigor of calibration procedures. I’ve seen quality incidents traced back to instruments that were either never calibrated or were operating years past their calibration interval. In every case, the cost of the investigation and remediation far exceeded what proper calibration would have cost.
Measurement accuracy is the foundation of every quality decision made from instrument data. If a pressure sensor in a manufacturing process reads 5% higher than actual pressure, every process control decision based on that reading is wrong by 5%. In some applications, that error is tolerable. In others pharmaceutical manufacturing, aerospace testing, medical device production it can have consequences that range from product recalls to patient safety incidents. The purpose of calibration is not paperwork compliance. It’s ensuring that the data driving decisions is actually reliable.
From a regulatory standpoint, calibration is mandatory across multiple frameworks. ISO 9001 requires organizations to determine when measurement accuracy is necessary and to maintain measuring equipment in a calibrated state with documented records. ISO/IEC 17025 requires calibration laboratories to have a comprehensive equipment calibration program with traceable standards and uncertainty evaluation. FDA GMP regulations require calibration of all instruments affecting product quality. In any of these environments, operating with uncalibrated equipment is not just a quality risk it’s a compliance failure with direct regulatory consequences including warning letters, audit findings, and in serious cases, facility shutdowns.
The Financial Case for Regular Calibration
The return on investment for a well-managed calibration program is straightforward to calculate and consistently positive. Equipment that drifts out of calibration undetected produces incorrect measurements. Those incorrect measurements drive incorrect decisions wrong process parameters, incorrect product specifications, failed quality tests that require retesting, or worse, products that pass quality checks they should have failed. Each of these outcomes costs money. Defective products that reach customers cost significantly more in recalls, warranty claims, reputational damage, and regulatory action.
Regular calibration prevents these costs by catching drift early, before it affects operational decisions. The cost of a calibration event is predictable and contained. The cost of a quality incident caused by an uncalibrated instrument is unpredictable and typically far larger. This is why calibration management is treated as a business investment in well-run organizations, not as an overhead cost to be minimized.
Understanding the Device Under Test and Reference Standard

The DUT and reference standard relationship is the technical core of every calibration event. Getting this relationship right selecting the appropriate reference, understanding its uncertainty, and applying the 4:1 accuracy rule determines whether the calibration result is meaningful or misleading. This is where many in-house calibration programs make their first significant mistake: using reference standards that are inadequately accurate for the instruments they’re calibrating, or using reference standards whose own calibration has lapsed.
The reference standard must itself be calibrated. This seems obvious when stated directly, but the implication is easy to overlook: the accuracy of every calibration you perform is only as good as the accuracy of the reference you’re calibrating against. If your reference standard has drifted since its last calibration, every instrument you calibrate against it carries that unknown error plus its own uncertainty. This is why the traceability chain matters each reference in your calibration hierarchy must have its own current, valid calibration from a source more accurate than itself.
Selecting the Right Reference Standard for Your DUT
Reference standard selection depends on three factors: the measurement parameter being calibrated (pressure, temperature, electrical, dimensional, flow), the accuracy range of the DUT, and the application’s tolerance requirements. A reference standard appropriate for calibrating a general-purpose industrial thermometer is not necessarily appropriate for calibrating a high-precision laboratory temperature reference. The parameter must match exactly you cannot use a pressure reference to calibrate a temperature instrument and the accuracy must meet the 4:1 ratio requirement.
In professional calibration laboratories, reference standards are classified by their position in the calibration hierarchy. Primary reference standards have the highest accuracy and are calibrated directly against national metrology institute standards. Secondary reference standards are calibrated against primary references and used to calibrate working references. Working references also called transfer standards are what most calibration technicians actually use when calibrating instruments in the field or in an in-house calibration lab. Each step down the hierarchy adds uncertainty, which is why maintaining short traceability chains is a mark of a high-quality calibration operation.
The Calibration Hierarchy and Pyramid Explained
The calibration hierarchy, sometimes visualized as a pyramid, represents the chain of traceability from the most accurate standards at the top to working instruments at the bottom. At the apex are the primary standards maintained by national metrology institutes NIST in the United States, PTB in Germany, NPL in the United Kingdom. These define the SI units with the smallest achievable uncertainty.
Below the NMI standards are accredited calibration laboratory references, then in-house reference standards, then working calibrators, and finally the instruments used in production, testing, and measurement applications. Every link in this chain must be documented calibrated against the level above it, with the calibration certificate and uncertainty statement kept on file. This unbroken documentation chain is what NIST traceability means in practice. For a deeper look at how the calibration process fits into this hierarchy, our calibration process guide covers each stage in detail.
The Calibration Hierarchy How the Pyramid Works
The calibration pyramid is not just a conceptual model it’s the practical framework that determines which reference you should use for a given calibration task and how to evaluate whether your calibration results are metrologically valid. Understanding where your instruments and references sit within this hierarchy tells you exactly what traceability documentation you need, what uncertainty you should expect, and whether your calibration program is set up correctly.
At the foundation of the pyramid sits every working instrument in your facility the pressure gauges on your production lines, the thermometers in your quality lab, the multimeters your technicians use for electrical testing. These are the instruments that directly affect your measurement results, and they sit at the widest part of the pyramid because there are more of them than any other level. They have the largest uncertainty of any level in the hierarchy because each step down from the primary standard adds uncertainty.
Above the working instruments sit your working calibrators the instruments your calibration team uses to calibrate the working instruments. These need to be calibrated by an accredited laboratory using reference standards traceable to NMI. Above those are secondary reference standards, then primary reference standards, then NMI standards at the top. Most organizations operating an in-house calibration program work primarily with working calibrators and occasionally with secondary references. Access to primary reference standards typically requires sending instruments to an accredited calibration laboratory.
Why Every Level of the Pyramid Matters
The pyramid’s practical importance is this: a break anywhere in the chain invalidates the traceability of everything below it. If your working calibrator’s calibration has lapsed, the calibration certificates you issue for instruments calibrated against it cannot claim traceability even if the calibrator is physically performing accurately. Traceability is a documentation requirement as much as a technical one. The chain of calibration certificates must be complete and current, or the claim of traceability does not hold.
This is why calibration management in professional environments tracks not just the calibration status of working instruments but the calibration status of every reference and calibrator in the hierarchy. A comprehensive calibration management system flags when any device at any level is approaching its calibration interval because an expired reference can trigger a cascade of invalid calibrations that must be investigated and potentially repeated.
How to Calibrate Equipment Step by Step

This is the practical core of everything in this guide. The step-by-step calibration procedure I’m walking through here applies across measurement parameters the specific tools and reference values change depending on whether you’re calibrating pressure equipment, temperature instruments, electrical devices, or flow meters, but the workflow structure is universal. Follow every step in sequence. Skipping steps doesn’t save time it invalidates the calibration and creates more work than it saves.
For the comprehensive background on calibration procedures across different applications, our complete calibration guide provides additional context that complements the step-by-step process here.
Step 1: Gather Documentation and Review Specifications
Before touching any instrument, collect the calibration procedure for the DUT, the manufacturer’s accuracy specifications, the previous calibration certificate, and the calibration certificate for the reference standard you’ll be using. Confirm that the reference standard’s calibration is current and that its accuracy meets the 4:1 ratio requirement for this specific DUT. Confirm the calibration interval is this calibration due because of a scheduled interval, or because of a specific trigger like instrument repair or a quality incident?
Review the DUT’s as-found condition from the previous calibration. The as-found values from previous calibration cycles are trend data they tell you whether the instrument has been historically stable or shows progressive drift. An instrument that consistently shows drift in the same direction is signaling a problem that calibration alone may not resolve.
Step 2: Prepare the Calibration Environment
Environmental conditions affect calibration accuracy more than most people appreciate until they’ve seen a calibration fail because of temperature instability. The standard reference temperature for calibration is 20°C (68°F), and most precision calibrations require the temperature to be stable within ±1°C during the calibration event. Humidity, vibration, and electromagnetic interference are secondary concerns for most calibrations but become critical for sensitive electrical and dimensional measurements.
Allow both the DUT and the reference standard adequate warm-up time. Most electronic instruments require 15 to 30 minutes of power-on time before calibration to allow internal components to reach thermal equilibrium. Sensitive instruments may require longer. Calibrating a cold instrument that hasn’t warmed up is one of the most common environmental mistakes the readings will drift as the instrument warms, producing calibration data that doesn’t represent the instrument’s actual operating performance.
Step 3: Record As-Found Condition
Before making any adjustments, record the DUT’s as-found readings across the full calibration range. Apply the reference standard’s output at multiple test points typically at 0%, 25%, 50%, 75%, and 100% of the instrument’s measurement range and record the DUT’s response at each point. These as-found values represent the instrument’s actual accuracy during its most recent period of service.
As-found data is critical for two reasons. First, it tells you whether the instrument was within tolerance during the period since its last calibration which informs your assessment of whether measurements taken during that period are reliable. Second, it contributes to your calibration interval optimization — if as-found values consistently show the instrument within tolerance, you may be able to extend the calibration interval. If as-found values consistently show significant drift, the interval should be shortened or the instrument investigated for a mechanical or electronic fault.
Step 4: Calculate Measurement Error and Deviation
At each test point, calculate the difference between the DUT’s reading and the reference standard’s output. This difference is the measurement error the deviation of the instrument from the true value at that point. Express the error both as an absolute value and as a percentage of the full measurement range to give context to its significance.
Compare each error value against the instrument’s specified tolerance limits. If the error at any test point falls outside the tolerance limits, the instrument is out of specification at that point and requires adjustment. If all error values fall within tolerance, the instrument passes as-found and may not require adjustment though you should still complete the full calibration procedure and document the results.
Step 5: Adjust the Instrument (If Required)
Adjustment is performed only when as-found readings fall outside the specified tolerance limits. The adjustment procedure depends entirely on the instrument type — some instruments have physical adjustment points (potentiometers, mechanical stops), others are adjusted through software or firmware, and others require factory service for adjustment.
Always follow the manufacturer’s adjustment procedure for the specific instrument. Improvised adjustment methods can damage instruments, introduce new error sources, or void manufacturer warranties. After any adjustment, allow the instrument to stabilize before taking verification readings — adjustment can temporarily disturb instrument stability, and verifying immediately after adjustment may give misleading results.
Step 6: Record As-Left Condition and Verify
After adjustment (or after confirming no adjustment was needed), record the DUT’s as-left readings across the full calibration range using the same test points as the as-found measurement. The as-left data represents the instrument’s final calibrated state. Both as-found and as-left data must appear in the calibration certificate as-found proves what condition the instrument was in, as-left proves what condition it was left in.
Calculate the residual error at each test point from the as-left readings. All residual errors must fall within the specified tolerance limits. If any as-left reading falls outside tolerance after adjustment, the adjustment was insufficient or the instrument has a fault that calibration cannot correct. In this case, the instrument should be taken out of service pending investigation.
Step 7: Calculate and Document Measurement Uncertainty
Measurement uncertainty is the quantified expression of doubt associated with the calibration result. Every professional calibration result must include an uncertainty statement — it is required by ISO/IEC 17025 and is the information that allows users to make informed decisions about whether the instrument’s accuracy is adequate for its intended application.
Uncertainty sources for a typical calibration include the reference standard’s uncertainty (from its calibration certificate), the resolution of both instruments, repeatability of the measurements, environmental effects, and any other factors that contribute to measurement variability. These sources are combined mathematically to produce the expanded uncertainty typically expressed at a 95% confidence level (coverage factor k=2).
Step 8: Issue Calibration Certificate and Update Records
The final step is documentation. Issue the calibration certificate with all required information: instrument identification, calibration date, next calibration due date, reference standards used with their traceability information, as-found and as-left data, measurement uncertainty, environmental conditions during calibration, and the technician’s identification and authorization.
Update your calibration management system to reflect the new calibration status, schedule the next calibration event, and file the calibration certificate in the instrument’s calibration history file. The certificate is a legal and quality document treat it accordingly.
Environmental Conditions That Affect Calibration Accuracy

Environmental control is the silent variable in calibration quality. Two identical instruments calibrated on the same day with the same reference standard can produce different calibration results if one is calibrated in a temperature-controlled lab and the other is calibrated on a factory floor with fluctuating temperature, humidity, and vibration. Understanding which environmental factors affect which types of calibration allows you to either control those factors or account for them in the uncertainty budget.
Temperature is the most universally significant environmental factor. Most measuring instruments — electronic, mechanical, and electromechanical have temperature coefficients that describe how their accuracy changes with temperature. Calibrating an instrument at 25°C when it will be used at 40°C introduces a systematic error equal to the instrument’s temperature coefficient multiplied by the 15-degree difference. For precision applications, this matters significantly.
Temperature Stability Requirements
Standard calibration temperature is 20°C, and most precision calibrations require stability within ±1°C throughout the calibration event. For ultra-precision calibrations dimensional metrology, high-accuracy electrical standards, primary reference calibrations the requirement may be ±0.1°C or tighter. Achieving this level of stability requires purpose-built calibration laboratories with active temperature control systems.
For field calibration, where controlled temperature isn’t available, the calibration procedure must account for the ambient temperature. Record the ambient temperature at the start and end of the calibration event, and apply temperature correction factors if the instrument’s temperature coefficient and the deviation from standard temperature are significant relative to the tolerance being assessed.
Humidity, Vibration, and Electromagnetic Effects
Humidity affects calibration primarily for electrical instruments and sensitive mechanical devices. High humidity can change electrical resistance values, affect insulation characteristics, and cause condensation on sensitive components. Most precision electrical calibration is performed at relative humidity between 45% and 75%. Below 20% RH, static electricity becomes a significant concern for precision electrical measurements.
Vibration affects dimensional and mechanical calibration most significantly. Calibrating a precision scale or balance on a surface subject to vibration from nearby machinery introduces random error that increases measurement uncertainty. Anti-vibration tables are standard equipment in laboratory calibration environments for exactly this reason. Electromagnetic interference from motors, power supplies, and radio frequency sources can affect sensitive electrical measurements calibration environments for precision electrical work should be assessed for electromagnetic compatibility.
Calibration Tools and Equipment You Actually Need

The tools required to calibrate equipment depend entirely on the measurement parameter involved, but there are principles that apply universally. Every calibration requires a reference standard that meets the 4:1 accuracy ratio, environmental monitoring equipment to document calibration conditions, and documentation tools to record results. Beyond these universal requirements, the specific calibrators and equipment vary by parameter.
Understanding the tool requirements for your specific calibration applications is essential for setting up an in-house calibration program. Purchasing calibrators without understanding their accuracy specifications relative to the instruments you need to calibrate is a common and costly mistake you may invest in equipment that doesn’t actually meet the 4:1 ratio for your highest-precision instruments.
Pressure Calibration Tools
Pressure calibration requires a pressure reference either a dead weight tester for the highest accuracy pressure calibrations, a digital pressure calibrator for general industrial work, or a pressure comparator for transferring pressure between a reference and the DUT. Dead weight testers generate precise pressure by applying known masses to a piston of known area, producing reference pressures accurate to better than 0.01% in well-maintained units. Digital pressure calibrators cover a wide range of pressure values and are more portable, making them the standard choice for field pressure calibration.
Multifunction calibrators that handle both pressure sourcing and reading in a single instrument are widely used in industrial settings for calibrating pressure transmitters, pressure gauges, and pressure switches. These instruments typically include features for documenting calibration results and calculating pass/fail status against programmed tolerance limits.
Temperature Calibration Tools
Temperature calibration requires a temperature reference typically a dry block calibrator or a liquid bath calibrator for contact temperature measurements, or a blackbody reference source for radiation thermometers. Dry block calibrators insert the temperature probe into a temperature-controlled metal block, providing a stable reference temperature for comparison against the DUT. They are portable and widely used for field calibration of industrial temperature sensors.
For the most accurate temperature calibrations, a calibrated reference thermometer typically a platinum resistance thermometer (PRT) is inserted alongside the DUT in the temperature reference. The reference thermometer provides the true temperature value at the calibration point, which is compared against the DUT’s reading. Our thermometer calibration resources cover the specific procedures for different types of temperature sensors including thermocouples, RTDs, and bimetallic thermometers.
Electrical Calibration Tools
Electrical calibration covers voltage, current, resistance, frequency, and related parameters. Multifunction electrical calibrators instruments that can source and measure a wide range of electrical quantities with high accuracy are the workhorses of electrical calibration. These instruments calibrate multimeters, power analyzers, oscilloscopes, clamp meters, and other electrical test equipment.
For high-accuracy electrical calibration, Josephson voltage standards and quantum resistance standards provide the most accurate electrical references available, maintained by national metrology institutes. At the working calibration level, precision voltage references, resistance decades, and calibrated signal sources provide the traceable electrical references needed for routine instrument calibration.
Scale and Balance Calibration Tools
Calibrating scales and balances requires certified calibration weights physical mass standards that have been calibrated against traceable reference masses. Calibration weights are classified by accuracy class (OIML or ASTM classes) which determines their tolerance specifications. The weight class required depends on the accuracy of the balance being calibrated a balance accurate to 0.001g requires higher-class calibration weights than a general-purpose platform scale accurate to 1g. For practical guidance on scale calibration procedures, our scale calibration section covers the specific requirements for different balance types and applications.
Types of Equipment Calibration and When Each Applies
Calibration is not a single activity it encompasses a range of measurement parameters, each with its own reference standards, procedures, tolerances, and compliance requirements. Understanding which type of calibration applies to a given instrument is the starting point for building a calibration program. The most common categories are pressure, temperature, electrical, dimensional, flow, and analytical and most industrial and laboratory facilities require calibration across multiple categories.
The type of calibration determines which reference standard and which calibration procedure apply. Applying a pressure calibration procedure to a temperature instrument, or using a temperature reference to calibrate an electrical instrument, are obviously wrong but subtler mistakes happen when the wrong subtype is applied. A calibrator appropriate for gauge pressure calibration is not appropriate for absolute pressure calibration without understanding the reference pressure difference.
Pressure Calibration
Pressure calibration applies to pressure gauges, pressure transmitters, pressure switches, pressure sensors, and vacuum gauges. It covers gauge pressure (referenced to atmospheric), absolute pressure (referenced to perfect vacuum), and differential pressure (the difference between two pressure points). Each requires a different reference approach and must match the instrument’s pressure reference type.
Pressure calibration is critical in process industries oil and gas, chemical manufacturing, pharmaceutical production, food and beverage processing where pressure measurements directly affect process control, product quality, and safety system performance. Regulatory standards in these industries often mandate specific calibration intervals and documentation requirements for pressure instrumentation.
Temperature Calibration
Temperature calibration covers thermocouples, resistance temperature detectors (RTDs), thermistors, bimetallic thermometers, infrared thermometers, and temperature transmitters. Temperature is one of the most widely measured parameters in industrial and laboratory settings, making temperature calibration one of the most common calibration activities.
Different temperature sensor types have different characteristics, different failure modes, and different calibration requirements. Thermocouples drift due to contamination and grain growth in the thermocouple wire — they typically require more frequent calibration than RTDs, which are inherently more stable. Infrared thermometers require calibration against blackbody reference sources, a fundamentally different calibration approach than contact sensor calibration.
Electrical Calibration
Electrical calibration covers voltage, current, resistance, power, frequency, and related parameters. It applies to multimeters, oscilloscopes, power analyzers, signal generators, clamp meters, insulation testers, and data acquisition systems. Electrical calibration is critical in electronics manufacturing, power distribution, telecommunications, and any application where electrical measurements affect product quality or safety.
The wide range of electrical quantities and instrument types makes electrical calibration one of the most technically diverse calibration categories. A calibration program for an electronics manufacturing facility may require calibration of hundreds of instruments across dozens of electrical parameters, each with its own reference requirements.
As-Found and As-Left Conditions Why Both Matter
As-found and as-left data are the two most important data points in any calibration record and they are the data points most frequently misunderstood or undervalued by organizations that treat calibration as a checkbox activity rather than a measurement quality process. Understanding what these two data sets tell you and how to use them is the difference between a calibration program that produces value and one that produces only paperwork.
As-found data answers the retrospective question: was this instrument accurate during the period since its last calibration? If the as-found readings show the instrument was within tolerance, then measurements taken during that period can be accepted with confidence the instrument was performing correctly throughout. If the as-found readings show the instrument was out of tolerance, then an investigation is required to assess whether measurements taken during the out-of-tolerance period were affected, and if so, what action is needed.
Using As-Found Data for Interval Optimization
As-found data across multiple calibration cycles is the most reliable basis for calibration interval optimization. An instrument that consistently shows as-found values well within tolerance at each calibration event is demonstrating stability which is evidence that the calibration interval could potentially be extended without increasing measurement risk. An instrument that consistently shows as-found values near or outside tolerance is demonstrating drift which is evidence that the interval should be shortened or the instrument investigated for a deteriorating component.
This data-driven approach to interval management is what distinguishes professional calibration programs from compliance-only programs. Simply calibrating every instrument on a fixed annual schedule regardless of historical performance wastes resources on stable instruments and misses opportunities to catch drifting instruments before they affect measurements. You can read more about this approach in our broader article on why calibration is important which covers the risk-based approach to calibration management in detail.
As-Left Data and Residual Error
As-left data is the calibration result that appears on the calibration certificate it represents the instrument’s accuracy at the conclusion of the calibration event, after any adjustments have been made. The as-left data tells users of the calibration certificate what accuracy they can expect from the instrument going forward, combined with the measurement uncertainty statement.
Residual error in as-left data the remaining deviation from true value after adjustment is normal and expected. No adjustment brings an instrument to perfect accuracy. The goal is to bring residual errors within the specified tolerance limits, not to eliminate them entirely. The as-left values, combined with the calibration uncertainty, allow users to calculate the worst-case accuracy they can expect from the instrument.
Measurement Uncertainty and the 4:1 Accuracy Rule
Measurement uncertainty is the concept that most clearly separates professional calibration from amateur instrument checking. Every measurement result carries uncertainty a quantified range within which the true value is expected to lie. For a calibration result, uncertainty tells you how confident you can be in the calibration and what accuracy the calibrated instrument can reliably deliver.
The uncertainty budget for a calibration event includes contributions from every source of error in the measurement process: the reference standard’s uncertainty (from its calibration certificate), the resolution of both the reference and the DUT, the repeatability of the measurements, the effect of environmental conditions, and any other factors that introduce variability. These contributions are combined using statistical methods defined in the Guide to the Expression of Uncertainty in Measurement (GUM) to produce the combined standard uncertainty, which is then multiplied by a coverage factor (typically k=2) to produce the expanded uncertainty at 95% confidence.
Applying the 4:1 Accuracy Rule in Practice
The 4:1 accuracy rule that the reference standard should be at least four times more accurate than the DUT exists to keep the reference standard’s uncertainty contribution small relative to the instrument’s tolerance. When the reference is exactly four times more accurate, its uncertainty contribution to the calibration result is manageable and the calibration produces a meaningful pass/fail determination against the instrument’s specification.
When the ratio falls below 4:1, the reference’s uncertainty becomes a significant fraction of the tolerance being assessed. In the extreme case where reference accuracy equals DUT accuracy, the calibration result is essentially meaningless you cannot determine whether the DUT is within its specification because the reference itself may be at the edge of its accuracy range. Many professional calibration standards recommend 10:1 ratios for critical applications precisely to minimize this concern.
When Uncertainty Is Too Large to Make a Decision
Sometimes the calibration uncertainty is large enough relative to the tolerance that a clear pass/fail determination cannot be made. An instrument reading 0.8% deviation against a 1% tolerance limit, with a calibration uncertainty of ±0.4%, has a measurement result that overlaps the tolerance boundary. In this situation, conservative practice is to treat the instrument as failing calibration — the uncertainty means the true deviation could be anywhere from 0.4% to 1.2%, and the possibility that it exceeds the tolerance limit cannot be excluded.
This is the practical consequence of calibration uncertainty that many calibration programs fail to account for. Recording a deviation of 0.8% against a 1% limit as a pass without considering the uncertainty of the measurement is technically incorrect and can result in instruments being accepted as within specification when they may actually be out of tolerance.
How to Calculate Calibration Error and Apply Correction Factors
Calculating calibration error is straightforward in concept and requires attention to detail in execution. At each calibration test point, the error is the difference between the DUT’s reading and the reference standard’s output. Positive error means the DUT reads higher than true value. Negative error means it reads lower. The magnitude of the error relative to the tolerance limits determines whether the instrument passes or fails at that point.
Error calculation: Error = DUT Reading − Reference Value
Percentage error: % Error = (Error ÷ Full Scale Range) × 100
This percentage error is what you compare against the instrument’s tolerance specification to determine pass/fail status. Always compare against the full-scale range specification, not the point value, unless the instrument’s specification is stated as a percentage of reading rather than percentage of full scale.
Applying Correction Factors
Correction factors are applied when an instrument cannot be adjusted to bring it within tolerance, but its systematic error is well-characterized enough to be mathematically corrected. Rather than adjusting the physical instrument, users apply a correction to every reading: Corrected Value = DUT Reading + Correction Factor.
Correction factors are only reliable when the error is systematic and stable it must be the same or very close to the same value at every measurement, not variable. An instrument with a stable +0.5% offset can be used reliably with a -0.5% correction applied to all readings. An instrument with variable error one that reads +0.5% at one point and -0.3% at another cannot be reliably corrected with a single factor and should be adjusted or replaced.
Common Calibration Mistakes That Kill Accuracy

This is the section that most calibration guides skip entirely and it’s the one that’s most valuable to working calibration technicians and quality managers. Knowing the procedure is necessary but not sufficient. Understanding where calibrations fail in practice, and why, is what separates technicians who consistently produce reliable calibration results from those who produce calibration certificates that look correct on paper but don’t represent actual instrument accuracy.
Mistake 1: Calibrating Without Adequate Warm-Up Time
This is the single most common calibration mistake I see in in-house calibration programs. Electronic instruments need time to reach thermal equilibrium after being powered on. Calibrating a cold instrument produces readings that drift as the instrument warms the calibration result represents the instrument’s cold performance, not its operational performance. Follow the manufacturer’s specified warm-up time without exception. For most electronic instruments, this is 15 to 30 minutes. For precision electrical standards, it may be several hours.
Mistake 2: Using Reference Standards With Expired Calibration
An expired reference standard is not a reference standard — it’s an instrument of unknown accuracy. Calibrations performed using an expired reference cannot claim traceability and may be producing incorrect calibration results without any indication that something is wrong. Every calibration management program must track the calibration expiry dates of reference standards as rigorously as it tracks the instruments being calibrated.
Mistake 3: Calibrating Only at One Test Point
Single-point calibration checks whether the instrument is accurate at one specific value, but tells you nothing about its accuracy anywhere else in its range. Linearity errors, zero offset errors, and span errors can all exist without being visible at a single test point. Always test at a minimum of five points across the full range zero, low, midpoint, high, and full scale and ideally more for instruments with complex response characteristics.
Mistake 4: Ignoring Environmental Conditions During Calibration
Recording calibration data without recording the environmental conditions is a professional failure. If a calibration result is later questioned, you need to be able to demonstrate that the calibration was performed under appropriate conditions. If conditions were outside the acceptable range, the calibration may not be valid. Ambient temperature, humidity, and any unusual environmental factors should be recorded at the start and end of every calibration event.
Mistake 5: Skipping As-Found Documentation
Performing calibration adjustments without first recording as-found data destroys the retrospective value of the calibration. You lose the ability to assess whether measurements taken since the last calibration were affected, and you lose the trend data that would allow you to optimize calibration intervals. As-found data takes five minutes to record. The information it provides is irreplaceable.
Mistake 6: Adjusting Instruments That Are Within Tolerance
Unnecessary adjustment of instruments that are performing within tolerance is counterproductive. Every adjustment introduces new sources of uncertainty and temporarily disturbs instrument stability. Adjusting instruments that don’t need it is both wasteful and potentially harmful it can shorten instrument life and introduce errors that were not previously present. If an instrument is within tolerance as-found, document that result and move on without adjustment.
Mistake 7: Confusing Calibration With Standardization
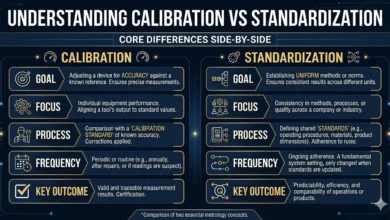
Using daily standardization records as evidence of calibration compliance is a mistake that can have serious regulatory consequences. Calibration and standardization serve different purposes, operate at different levels of the quality system, and produce different documentation. If you need to understand the distinction in detail before building your calibration program, our article on calibration vs standardization covers this comprehensively.
How to Calibrate Equipment in the Field vs Laboratory

The decision between field calibration and laboratory calibration is not just logistical it affects the achievable calibration accuracy, the documentation rigor, and the environmental control available during the calibration event. Both approaches are valid; both have appropriate use cases. Understanding the differences allows you to make deliberate decisions about which approach to use for each instrument in your calibration program.
Laboratory calibration is performed in a controlled environment typically a dedicated calibration lab with temperature control, humidity control, vibration isolation, and electromagnetic shielding for sensitive measurements. The controlled environment reduces uncertainty contributions from environmental factors, allowing higher accuracy calibration results. Laboratory calibration is the appropriate choice for precision instruments, reference standards, and instruments that must meet the tightest tolerance specifications.
Field Calibration When and How
Field calibration is performed on-site at the instrument’s installation location, without removing the instrument from service. It is appropriate for instruments that are difficult or impractical to remove from service, instruments whose accuracy doesn’t require the tightest tolerances, and situations where removing instruments from service would cause unacceptable operational disruption.
The challenge with field calibration is environmental control. Process environments factory floors, outdoor installations, hazardous areas present temperature fluctuations, vibration, humidity variations, and electromagnetic interference that laboratory environments don’t. The calibration procedure must account for these conditions either by controlling them (using portable temperature-controlled enclosures), measuring and correcting for them, or accepting larger calibration uncertainty that reflects the environmental variability.
Portable calibrators designed for field use multifunction process calibrators, handheld pressure calibrators, dry block temperature calibrators are engineered to perform well in field conditions and provide adequate accuracy for most industrial calibration applications. Their accuracy specifications are typically somewhat wider than laboratory instruments, reflecting the compromises required for portability and field operation.
Laboratory Calibration When It’s Required
Laboratory calibration is required whenever the instrument’s tolerance is tight enough that field environmental conditions would significantly impact calibration quality, whenever the instrument is a reference standard that will be used to calibrate other instruments, or whenever regulatory requirements specify laboratory calibration. Precision analytical balances, high-accuracy electrical standards, dimensional measurement instruments, and reference thermometers all typically require laboratory calibration.
Sending instruments to an accredited external calibration laboratory is the standard approach when in-house laboratory calibration capability doesn’t exist or when the required reference accuracy exceeds in-house capabilities. External accredited laboratories operating under ISO/IEC 17025 provide calibration certificates with full uncertainty statements and NIST traceability meeting the documentation requirements of ISO 9001, GMP, and other quality frameworks.
Calibration Intervals How Often Should Equipment Be Calibrated

Calibration interval determination is one of the most consequential decisions in calibration management, and it’s one that many organizations get wrong either by defaulting to arbitrary fixed intervals that ignore instrument performance data, or by extending intervals to save cost without proper risk assessment. The right calibration interval is the longest interval that maintains acceptable measurement risk for the application.
The factors that determine calibration interval are instrument stability history (as-found data trends), usage intensity (how frequently and how heavily the instrument is used), environmental exposure (does the instrument operate in a harsh environment that accelerates drift), the consequence of measurement error (what happens if the instrument is out of tolerance and isn’t detected), and applicable regulatory requirements (some standards specify maximum calibration intervals that cannot be extended regardless of performance history).
Manufacturer Recommendations as a Starting Point
Manufacturer-recommended calibration intervals are a reasonable starting point for new instruments without calibration history. They reflect the manufacturer’s knowledge of the instrument’s typical drift characteristics and the conditions under which it was designed to operate. However, manufacturer recommendations are conservative by design they assume worst-case usage and environmental conditions. For instruments operating in favorable conditions with moderate usage, the actual calibration interval supported by performance data may be longer than the manufacturer’s recommendation.
Risk-Based Interval Adjustment
Once an instrument has accumulated at least three calibration cycles of as-found data, that data should drive interval decisions. An instrument that consistently shows minimal drift at the scheduled calibration interval is a candidate for interval extension. An instrument that consistently shows significant drift is a candidate for interval shortening or for investigation to determine whether the drift indicates a deteriorating component that calibration alone cannot address.
The risk assessment for interval adjustment should consider both the probability that the instrument will drift out of tolerance before the next calibration and the consequence if it does. A non-critical monitoring instrument in a stable environment may tolerate an annual calibration interval with acceptable risk. A safety-critical instrument in a harsh environment may require quarterly or more frequent calibration regardless of historical performance.
Calibration Documentation and Certificate Requirements
Calibration documentation is not administrative overhead it is the evidence that calibration was performed correctly, the proof of traceability, and the record that makes every measurement taken with a calibrated instrument defensible. In regulated industries, inadequate calibration documentation is treated the same as missing calibration neither satisfies the compliance requirement. Documentation must be complete, accurate, and retained for the period required by the applicable standard or regulation.
A calibration certificate is the formal record of a calibration event. Its content requirements are defined by ISO/IEC 17025 for accredited calibration laboratories and by ISO 9001 and applicable industry standards for in-house calibration programs. The minimum content required for a metrologically valid calibration certificate includes instrument identification (manufacturer, model, serial number), calibration date and next calibration due date, reference standards used with their traceability information and calibration certificate numbers, environmental conditions during calibration, calibration results including as-found and as-left data at each test point, measurement uncertainty, and the authorized signature of the calibration technician or approver.
Calibration Records vs Calibration Certificates
A calibration record is the working document produced during the calibration event the data sheet where readings are recorded during the calibration procedure. A calibration certificate is the formal document issued after the calibration is reviewed and approved. In professional calibration practice, these are distinct documents with distinct purposes.
The calibration record contains all the raw data from the calibration every reading taken, every calculation performed, notes about any anomalies observed. The calibration certificate contains the reviewed, approved summary of the calibration result. Both should be retained, because an auditor reviewing calibration records may want to see the raw data that supports the certificate, not just the certificate itself.
Retention Requirements
Calibration record retention requirements vary by industry and applicable standard. ISO 9001 requires retention for the period specified by the organization, which should be at least the lifetime of the equipment plus one calibration cycle. GMP regulations typically require retention for at least one year beyond product expiry for pharmaceutical manufacturing records. ISO/IEC 17025 requires calibration laboratories to retain records for a minimum period defined in their quality management system typically a minimum of five years.
Calibration Management Systems and Asset Tracking
Managing calibration manually with spreadsheets, paper records, and calendar reminders is sustainable for small numbers of instruments but breaks down quickly as the instrument population grows. A calibration management system (CMS), sometimes implemented as part of a broader computerized maintenance management system (CMMS), automates the tracking, scheduling, and documentation functions of a calibration program.
A well-implemented calibration management system maintains a complete inventory of all instruments requiring calibration, tracks calibration due dates and sends advance notifications, stores calibration certificates and records in a searchable database, tracks the calibration status of reference standards as well as working instruments, generates calibration work orders and certificates, and provides reporting for audit preparation and compliance demonstration.
What to Look for in Calibration Management Software
The most important capabilities for calibration management software in a professional environment are traceability tracking the system must link each instrument to the reference standards used to calibrate it and to those standards’ own calibration records and audit trail maintenance all actions in the system should be logged with user identification, date, and timestamp. Without these capabilities, the software is little more than a reminder system.
Asset tracking integration allows calibration management to connect with the broader asset lifecycle when an instrument is sent for repair, the calibration management system records the event, triggers a post-repair recalibration requirement, and tracks the instrument through the repair and recalibration process. This integration prevents instruments from returning to service after repair without the required recalibration.
Business Impact ROI of Proper Equipment Calibration
The return on investment of a properly managed calibration program is measurable in several dimensions. Direct cost savings come from reduced defects and rework instruments that are accurately calibrated produce correct measurements that drive correct process control decisions, reducing the production of out-of-specification product. In manufacturing environments with high material costs, the reduction in scrap from accurate process control can be substantial.
Indirect cost savings come from audit preparedness and regulatory compliance. Organizations with well-managed calibration programs pass audits with minimal findings, avoiding the cost of corrective actions, re-audits, and regulatory sanctions. They avoid the reputational damage and customer relationship costs of quality incidents traced to calibration failures. And they avoid the operational disruption of emergency recalibrations triggered by discovered calibration gaps.
Calibration and Downtime Prevention
Planned calibration is predictable and schedulable. Unplanned equipment removal from service due to discovered calibration gaps, quality incidents, or regulatory findings is not. The difference between a planned one-day calibration event and an unplanned three-day investigation and recalibration triggered by a quality incident is significant in terms of operational disruption and cost.
Proactive calibration management with calibration scheduled at appropriate intervals based on risk and performance data keeps calibration costs predictable and prevents the costly disruptions that result from reactive calibration management. For industries where measurement downtime directly affects production output or service delivery, this predictability has significant financial value.
Quality Control and Compliance as Competitive Advantage
Organizations that maintain rigorous calibration programs earn quality certifications ISO 9001, ISO/IEC 17025, GMP compliance that are often requirements for doing business with major customers or in regulated markets. These certifications represent a competitive advantage that has direct commercial value. Customers in regulated industries pharmaceutical, aerospace, medical device require their suppliers and service providers to maintain documented calibration programs as a condition of doing business.
FAQs
1. What is the first step to calibrate equipment correctly?
The first step is gathering all documentation the calibration procedure for the instrument, its accuracy specifications, its calibration history, and the calibration certificate for the reference standard you’ll be using. Before taking any measurement, confirm that the reference standard’s calibration is current, that its accuracy meets the 4:1 ratio requirement for the instrument being calibrated, and that the calibration environment meets the temperature and humidity requirements for the procedure.
2. What is a Device Under Test in calibration?
The Device Under Test, or DUT, is the instrument being calibrated the device whose accuracy needs to be established, verified, or restored. Every calibration event involves comparing the DUT against a reference standard that is more accurate than the DUT, typically by a factor of four or more. The DUT can be any measuring instrument a pressure gauge, thermometer, multimeter, balance, flow meter, or any other device that produces measurement readings.
3. How do you know when equipment needs to be calibrated?
Equipment needs calibration when its scheduled calibration interval is due, when it has been repaired or serviced in a way that could affect its accuracy, when it has been subjected to conditions outside its specified operating range, when its readings appear inconsistent or suspect, or when a quality incident investigation identifies it as a potential error source. The calibration due date on the calibration certificate is the primary trigger, but these event-based triggers should also initiate immediate recalibration regardless of the schedule.
4. What is the 4:1 accuracy rule in calibration?
The 4:1 accuracy rule states that the reference standard used to calibrate an instrument should be at least four times more accurate than the instrument being calibrated. If the instrument has a tolerance of ±1%, the reference standard should have an accuracy of ±0.25% or better. This ratio ensures that the reference standard’s uncertainty contribution to the calibration result is small enough to produce a meaningful assessment of whether the instrument is within its specified tolerance limits.
5. What is measurement uncertainty in calibration?
Measurement uncertainty is the quantified range within which the true value of a measurement is expected to lie, expressed at a defined confidence level. In calibration, uncertainty captures contributions from the reference standard’s accuracy, the resolution of both instruments, measurement repeatability, environmental effects, and other error sources. Every professional calibration certificate must include an uncertainty statement without it, the calibration result cannot be properly interpreted or used for compliance purposes.
6. What is the difference between as-found and as-left calibration data?
As-found data is the instrument’s readings before any calibration adjustments it represents the instrument’s actual accuracy during its most recent period of use and is critical for assessing whether measurements taken since the last calibration were reliable. As-left data is the instrument’s readings after any adjustments, representing its calibrated state at the conclusion of the calibration event. Both must appear in the calibration certificate, as each tells a different and equally important part of the instrument’s performance story.
7. How often should equipment be calibrated?
Calibration frequency depends on the instrument’s stability history, usage intensity, environmental conditions, the consequence of measurement error in the application, and any regulatory requirements that specify maximum calibration intervals. General guidance is high-precision or safety-critical instruments every 3 to 6 months, standard industrial instruments every 6 to 12 months, and low-use or non-critical instruments annually. However, these are starting points calibration intervals should be adjusted based on as-found data trends from actual calibration history.
8. Can I calibrate equipment without sending it to a lab?
Yes, in-house calibration is appropriate for many instruments when you have adequate reference standards, qualified technicians, documented procedures, and appropriate environmental conditions. In-house calibration is most appropriate for general industrial instruments with moderate accuracy requirements. Instruments requiring the highest accuracy, primary reference standards, and instruments whose calibration requires capabilities beyond your in-house reference standards should be sent to an ISO/IEC 17025 accredited calibration laboratory.
9. What is NIST traceability and why does it matter for equipment calibration?
NIST traceability means that a calibration result can be linked back to the National Institute of Standards and Technology’s primary measurement standards through an unbroken chain of calibrations, each with documented uncertainty. It matters because it is the basis for measurement credibility NIST-traceable calibration results are internationally recognized as valid, can be compared with results from other calibrated instruments anywhere in the world, and satisfy the traceability requirements of ISO 9001, ISO/IEC 17025, GMP, and other quality and regulatory frameworks.
10. What happens if you calibrate equipment incorrectly?
Incorrect calibration produces calibration results that don’t accurately represent the instrument’s true accuracy. The instrument may be left out of tolerance without the error being detected, or it may be over-adjusted in a way that introduces new errors. All measurements taken with an incorrectly calibrated instrument carry an unknown systematic error. In regulated environments, incorrect calibration can trigger quality investigations, product recalls, and regulatory sanctions. The most common causes of incorrect calibration are inadequate warm-up time, expired reference standards, single-point testing, poor environmental control, and skipping as-found documentation.
11. What is calibration drift and how does it affect measurements?
Calibration drift is the gradual change in an instrument’s accuracy over time due to component aging, environmental exposure, mechanical wear, or continuous use. Drift causes the instrument’s readings to progressively deviate from true values even an instrument that was perfectly calibrated at its last calibration event will drift over time. The rate and direction of drift vary by instrument type, usage conditions, and environmental factors. Regular calibration detects drift and corrects it before the accumulated error becomes large enough to affect measurement reliability significantly.
12. What is the calibration pyramid and how does it relate to traceability?
The calibration pyramid is a visual model of the measurement hierarchy from primary standards maintained by national metrology institutes at the apex, through reference standards, working calibrators, and down to working instruments at the base. The pyramid represents both the accuracy hierarchy (standards higher in the pyramid are more accurate) and the traceability chain (each level is calibrated against the level above it, with documented uncertainty). Every working instrument should be traceable through this pyramid back to national or international measurement standards.
13. Who should perform equipment calibration in-house technicians or external labs?
The answer depends on the instruments involved, the accuracy requirements, and the in-house capabilities available. In-house calibration by qualified technicians is appropriate for general industrial instruments when adequate reference standards and procedures are in place. External accredited calibration laboratories are appropriate for precision instruments, reference standards, instruments whose accuracy requirements exceed in-house capabilities, and situations where formal ISO/IEC 17025 accredited calibration certificates are required for regulatory compliance.
14. What should a calibration certificate include?
A valid calibration certificate must include the instrument’s identification (manufacturer, model, serial number), calibration date and next calibration due date, reference standards used with their traceability documentation, environmental conditions during calibration, calibration results showing as-found and as-left values at each test point, measurement uncertainty, and the authorized signature of the responsible technician or approver. Calibration certificates missing any of these elements are incomplete and may not satisfy regulatory or customer requirements.
15. How does calibration relate to ISO 9001 and ISO/IEC 17025 compliance?
ISO 9001 requires organizations to ensure that measuring equipment is calibrated or verified against measurement standards traceable to international or national measurement standards, at specified intervals, and that the calibration status is maintained with documented records. ISO/IEC 17025 sets more detailed requirements specifically for calibration and testing laboratories, including uncertainty evaluation, traceability, and the content of calibration certificates. Compliance with both standards requires a documented calibration management program with traceable standards, defined intervals, qualified personnel, and complete calibration records.
Conclusion
After spending time working through every dimension of equipment calibration from the fundamental DUT versus reference standard relationship to the practical realities of field calibration, uncertainty evaluation, and interval management what stands out most to me is how consistently the organizations that get calibration right treat it as a measurement quality discipline rather than a compliance checkbox.
The step-by-step process I’ve covered here is straightforward in structure. Prepare the environment, stabilize the instrument, record as-found data, compare against a traceable reference, calculate errors, adjust if needed, record as-left data, evaluate uncertainty, and document everything. Seven steps, universally applicable regardless of measurement parameter. The process isn’t complicated. What makes calibration professionally demanding is the discipline of doing every step correctly, every time, without shortcuts.
The mistakes I covered skipping warm-up time, using expired references, single-point testing, ignoring environmental conditions, adjusting instruments that don’t need adjustment are not exotic failures. They’re the common, everyday shortcuts that seem harmless in isolation but accumulate into calibration programs that produce unreliable results while consuming the time and resources of a rigorous program.
The business case for calibration done correctly is clear and measurable. Accurate measurements reduce defects, prevent recalls, support regulatory compliance, and build the kind of measurement credibility that customers in regulated industries require as a condition of doing business. The cost of calibration is predictable and manageable. The cost of calibration failure is unpredictable and typically far larger.
Whether you’re building an in-house calibration program from scratch, improving an existing one, or trying to understand calibration well enough to evaluate the service you’re receiving from an external laboratory, the principles in this guide give you the foundation to make informed decisions. Calibration is ultimately about trust trust in the measurements that drive your quality decisions, your process control, your regulatory compliance, and your product integrity. Getting it right is not optional. It’s the baseline from which everything else in measurement quality builds.
Also Read: