How to Calibrate Screen Color & White Balance on Android Devices | Complete 2026 Accuracy Guide
Restore True Colors on Your Android – From Basic Fixes to Advanced RGB Calibration
How to Calibrate Screen Color & White Balance on Android Devices means adjusting your phone’s display settings like screen mode, white balance slider, and RGB balance to remove yellow, reddish, or dull tint and restore natural, accurate colors. In most cases, you can fix screen tint issues in under five minutes using built-in Android display controls without installing any third-party apps.
If your phone screen suddenly looks yellowish, overly warm, faded, or strangely reddish, it can be frustrating especially when photos don’t look natural and whites appear cream instead of clean white. Many Android users panic, thinking their display is damaged or the panel is defective. But in most cases, the problem isn’t hardware at all it’s calibration. Understanding How to Calibrate Screen Color & White Balance on Android Devices can completely transform your viewing experience.
Whether your display looks brownish, too saturated, or washed out, proper screen calibration restores balance, improves comfort, and brings back realistic color tones. The best part? You don’t need technical tools or professional software. With the right adjustments, you can correct color temperature, fix tint imbalance, and achieve accurate white tones directly from your device settings. Let’s start by understanding what calibration really means.
What Does It Mean to Calibrate Screen Color & White Balance on Android Devices.?
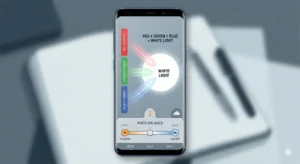
Calibrating screen color and white balance on Android devices means correcting how your display reproduces white tones, color temperature, and color balance so that colors appear natural, neutral, and visually accurate. It is not about increasing brightness or contrast it is about adjusting how red, green, and blue channels combine to produce balanced whites and realistic colors.
When white balance is misaligned, whites may appear yellowish, bluish, or slightly brown. Skin tones can look unnatural, and overall display quality may feel “off” even if resolution is sharp. Calibration ensures that your device maintains proper color temperature and consistent color reproduction across apps, images, and videos.
Screen Color Calibration vs Brightness Adjustment
Brightness controls how much light your screen emits.
Calibration controls how colors are displayed.
Increasing brightness will not fix a yellow tint. Similarly, lowering brightness will not correct a reddish cast. These are color balance issues not light intensity problems.
What Is White Balance in Simple Terms.?
White balance refers to how “white” appears on your screen. Ideally, white should look neutral neither warm (yellow) nor cool (blue). When white balance shifts, every other color shifts with it because white acts as the base reference for the entire display spectrum.
Why White Looks Yellow or Blue on Some Devices
Color temperature settings, night light filters, and display modes often cause these shifts. Warm temperature settings add more red and green tones, creating a yellow appearance. Cooler settings increase blue tones, which may feel sharper but less natural.
OLED vs LCD Color Behavior Differences
OLED panels tend to produce deeper blacks and more vibrant colors but may shift slightly warmer over time due to organic pixel aging. LCD panels usually maintain more stable whites but may appear slightly cooler depending on manufacturer tuning. Understanding your panel type helps set realistic calibration expectations.
Why Your Android Screen Looks Yellowish, Brownish, or Reddish (And How to Fix It Fast)
If your screen looks yellowish on Android, appears slightly brown, or has a reddish tint, the issue is usually caused by color temperature settings, Night Light mode, screen mode configuration, or RGB imbalance not hardware damage. In most cases, you can fix screen tint on Android within minutes by adjusting display settings, switching color modes, or resetting white balance controls.
Before assuming your display is defective, diagnose the real cause using the checklist below.
Screen Looks Yellowish Android – Most Common Causes
A yellowish screen is the most reported calibration issue among Android users. This usually happens because the display temperature is set too warm.
Common reasons include:
- Night Light / Eye Comfort Mode enabled
- Warm color temperature slider pushed too far
- Vivid mode oversaturation
- Manufacturer default warm tuning
- Recent software update resetting display profile
Quick Fix (Under 60 Seconds)
- Go to Settings → Display
- Disable Night Light / Eye Comfort Mode
- Open Screen Mode
- Switch from Vivid to Natural (or vice versa to test)
- Adjust white balance slightly toward cooler tone
Test using a white background image. White should look neutral not cream or pale yellow.
Display Looks Brown Android – RGB Imbalance Explained
If your display looks brownish instead of pure white or grey, this often means red and green channels are overpowering blue. Brown tint is a subtle but noticeable color imbalance that reduces clarity and contrast.
This can happen when:
- Manual RGB calibration android settings were over-adjusted
- Adaptive display mode enhanced warm tones
- Blue channel intensity is too low
Fix for Brown Tint
- Access RGB controls (if available)
- Increase blue slightly (1–2 steps only)
- Lower red minimally
- Re-test under neutral lighting
Avoid extreme adjustments. Small changes make a big difference.
Screen Looks Reddish – Red Channel Overload
If your screen looks reddish, especially noticeable on white or grey backgrounds, it often indicates excessive red channel dominance or aggressive vivid mode enhancement.
This may happen after:
- Updating firmware
- Enabling high saturation mode
- Manually adjusting color sliders
Screen Looks Reddish Fix
- Switch to Natural mode immediately
- Reset white balance slider to center
- Reduce red channel in RGB calibration (if available)
- Restart device after adjustments
If the reddish tint persists across safe mode, then hardware inspection may be needed but this is rare.
Cool Tone vs Warm Tone Display – Understanding the Balance
Some users confuse warm tone with defect. A slightly warm display can reduce eye strain at night, while cool tone appears brighter and sharper.
However:
- Too warm = yellow screen
- Too cool = bluish white
- Balanced = neutral white (similar to daylight paper)
The goal is not “coolest” or “warmest” it’s neutral.
Software Issue vs Hardware Problem – How to Know
Before worrying about panel damage, check:
- Does the tint change when switching modes?
- Does screenshot look normal on another device?
- Did the issue start after update?
If color changes with display settings, it’s calibration not hardware.
If tint remains identical in safe mode and across resets, then hardware might be involved.
Fast Diagnostic Checklist
- Disable Night Light
- Switch between Vivid and Natural mode
- Reset display settings
- Check RGB slider balance
- Restart device
In 90% of cases, this resolves screen tint Android issues completely.
How to Calibrate Screen Color Android Using Built-In Settings (Step-by-Step for Real Results)
To properly calibrate screen color on Android, you need to adjust display mode, white balance temperature, and if available RGB sliders using your phone’s built-in settings. You do not need root access, paid apps, or external calibration tools for most tint and color imbalance issues. The key is making small, controlled adjustments and testing against neutral backgrounds.
Below is the safest and most effective method to follow.
Step 1: Reset Your Starting Point First
Before adjusting anything, return your display to a neutral baseline.
- Go to Settings → Display
- Disable Night Light / Eye Comfort Mode
- Turn off any third-party screen filter apps
- Set brightness to mid-level (around 50%)
- Choose default display mode (usually Natural)
Starting from neutral prevents overcorrection.
Step 2: Switch Between Screen Modes (Vivid vs Natural)
Most Android phones offer at least two screen profiles:
- Vivid Mode – More saturated, higher contrast
- Natural Mode – More color-accurate and balanced
If your screen looks yellowish Android users should first switch modes and compare.
- If colors look too intense → Choose Natural
- If colors look dull or grey → Try Vivid
Always test using:
- A white background
- A human face photo
- A grey image
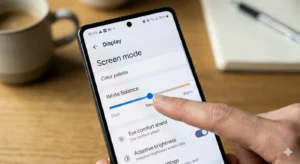
Step 3: Adjust White Balance Android Slider Properly
Many devices allow manual temperature adjustment.
To adjust white balance Android correctly:
- If screen looks yellow → Slide slightly toward cool
- If screen looks bluish → Slide slightly toward warm
- Move in small increments only
The goal is neutral white not bright blue.
Ideal reference:
White should look similar to white paper under daylight.
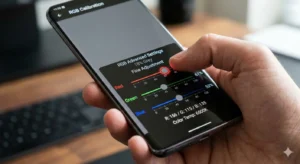
Step 4: Samsung Screen Mode Settings (Galaxy Devices)
On Samsung Galaxy phones:
Settings → Display → Screen Mode
You’ll see:
- Vivid
- Natural
If Vivid is selected, tap White Balance to unlock fine tuning.
Adjust Colors on Galaxy Phone
Samsung allows:
- Red
- Green
- Blue sliders
Best practice:
- Change one slider at a time
- Adjust 1–2 points only
- Recheck with neutral image
Samsung calibration control is more advanced than stock Android, so avoid aggressive changes.
Step 5: Sony Xperia White Balance Controls
Sony Xperia devices provide deeper manual calibration.
To access:
Settings → Display → White Balance
Sony allows precise RGB calibration android adjustments.
Sony displays are often closer to neutral by default, so adjustments should be minimal.
Step 6: Pixel & Stock Android Devices
Google Pixel and stock Android devices typically offer:
- Adaptive Color
- Natural
- Boosted (on some models)
If tint appears:
- Switch from Adaptive to Natural
- Disable Night Light
- Restart device
Stock Android has limited manual RGB control, so mode switching is your primary fix.
Step 7: Test Calibration the Right Way
After adjusting:
- Open a pure white image
- Open a grey background
- View a natural skin tone photo
- Check under daylight (not dark room)
If white looks neutral and skin tones look natural, your calibration is successful.
Common Mistakes While Calibrating Screen Color Android
- Increasing brightness to fix tint
- Pushing white balance to extreme cool
- Adjusting all RGB sliders at once
- Calibrating under colored room lighting
- Using screen filter apps on top of system settings
Calibration is about balance not exaggeration.
Pro Tip for Accurate Results
Calibrate during daytime under neutral lighting conditions.
Avoid calibrating in yellow room lighting it can trick your perception.
Your eyes adapt quickly, so take short breaks while adjusting.
When done correctly, calibrating screen color android settings improves:
- Photo accuracy
- Reading comfort
- Reduced eye strain
- True white balance
- More realistic video playback
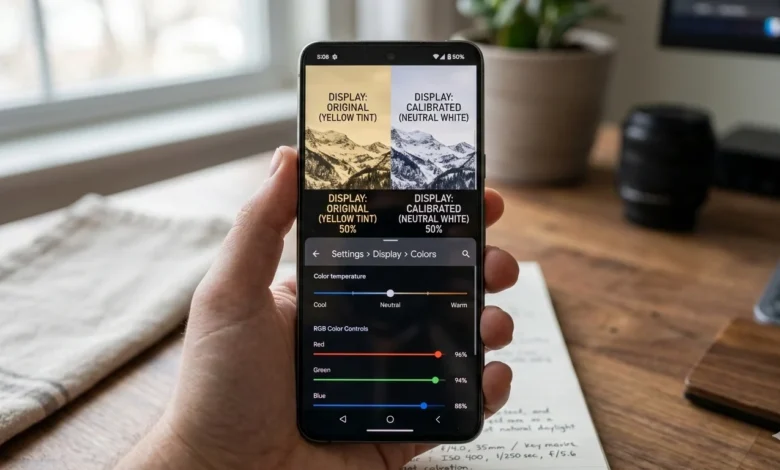
Adjust White Balance Android for Neutral & Scientifically Accurate Display
To properly adjust white balance on Android, you need to fine-tune the display’s color temperature so that whites appear neutral not yellowish, not bluish. White balance directly affects every color on your screen because white is the reference base for the entire color spectrum. When white is balanced correctly, skin tones look natural, text looks clean, and photos appear more realistic.
Most Android devices allow white balance adjustment through a simple warm-to-cool slider. The trick is not to chase extreme coolness or warmth but to find a neutral midpoint that matches daylight conditions.
Cool Tone vs Warm Tone Display – What’s the Real Difference.?
Understanding this difference prevents overcorrection.
Warm Tone Display:
- Adds more red and green
- Whites look slightly yellow or creamy
- Easier on eyes at night
- Less color accurate in daylight
Cool Tone Display:
- Adds more blue
- Whites look brighter and sharper
- Better clarity perception
- Can feel harsh or artificial if pushed too far
The goal of calibration is balance not preference extremes.
What Is the Ideal White Balance Setting.?
Scientifically, neutral white is around 6500 Kelvin (D65 standard). This is the reference point used in professional displays and sRGB color standards.
While Android phones don’t show Kelvin numbers directly, the midpoint of the white balance slider usually approximates neutral daylight calibration.
If your screen:
- Looks yellow → Move slightly toward cool
- Looks blue → Move slightly toward warm
Adjust in very small steps, then test again.
How to Test If Your White Balance Is Accurate
Use these simple checks:
- Open a pure white image
- Open a neutral grey image
- Compare against real white paper under daylight
- Check natural skin tones in photos
If white looks clean and skin tones look realistic not pinkish or pale you’re close to accurate calibration.
White Balance for Different Usage Types
Not everyone needs identical calibration.
For Reading & Browsing:
Slightly warm can reduce eye strain.
For Photo Editing:
Neutral or slightly cool is more accurate.
For Gaming & Media:
Balanced neutral works best to preserve intended colors.
Avoid setting extreme cool mode just because it “looks brighter.” Accuracy and comfort matter more than sharpness illusion.
Why Your Eyes Can Trick You During Calibration
Your eyes adapt quickly to color temperature. If you use a warm display for weeks, neutral white might initially look bluish even if it’s technically accurate.
To avoid perception bias:
- Adjust slowly
- Take short breaks
- Recheck under natural daylight
Calibration is about objective balance not what feels dramatic at first glance.
Common White Balance Mistakes to Avoid
- Sliding temperature to maximum cool
- Adjusting at night under yellow room lighting
- Calibrating while Night Light is active
- Making multiple changes at once
- Ignoring RGB imbalance if tint persists
White balance correction should feel subtle, not dramatic.
Final Goal of White Balance Adjustment
When done correctly, adjusting white balance Android settings should result in:
- Neutral white backgrounds
- Natural skin tones
- Balanced contrast
- Comfortable viewing
- Consistent color across apps
If white looks clean and nothing feels “off,” your calibration is working.
RGB Calibration Android – Advanced Manual Color Tuning for Precise Display Accuracy
RGB calibration Android allows you to manually adjust the red, green, and blue color channels that combine to create every color on your screen. While white balance sliders adjust overall temperature (warm vs cool), RGB calibration gives you fine-grained control over how each primary color contributes to the final output. This method is ideal for users who still see tint issues after basic calibration or want higher color accuracy for editing, design, or content creation.
However, RGB tuning must be done carefully. Over-adjusting even one channel can distort skin tones, reduce contrast accuracy, and create unnatural color shifts.
What Is RGB Calibration Android in Simple Terms?
Every display produces colors by mixing:
- Red
- Green
- Blue
When these three are balanced equally, you get neutral white.
If one channel dominates:
- Too much red → reddish or warm tint
- Too much green → slightly muddy or brownish tone
- Too much blue → overly cool or bluish screen
RGB calibration corrects this imbalance at the source.
When Should You Use RGB Calibration.?
Use RGB calibration Android only if:
- White balance slider didn’t fully fix tint
- Screen still looks slightly off in neutral mode
- You want better color precision for photo/video work
If your display looks normal after basic calibration, avoid unnecessary RGB tweaking.
Safe Step-by-Step RGB Calibration Method
Follow this controlled approach:
Step 1: Start Neutral
- Set screen mode to Natural
- Reset RGB sliders to default (center position)
Step 2: Use a Neutral Test Image
Open:
- Pure white image
- 50% grey image
- Natural skin tone photo
Step 3: Adjust One Channel at a Time
Move only 1–2 points per adjustment.
Example:
If screen looks yellowish → increase blue slightly
If screen looks reddish → reduce red slightly
If screen looks dull → increase green slightly (carefully)
Never adjust all three sliders at once.
Step 4: Recheck After Each Change
Pause 10–15 seconds before judging the result.
Your eyes need time to adapt.
Common RGB Calibration Mistakes (Avoid These)
- Pushing one channel to extreme levels
- Adjusting based on one image only
- Calibrating in dark or colored lighting
- Using maximum brightness during adjustment
- Forgetting to disable Night Light
RGB tuning should be subtle, not dramatic.
How to Test RGB Accuracy Without Professional Tools
You don’t need calibration hardware to check basic accuracy.
Use this method:
- Compare white screen to real white paper under daylight
- Check if grey looks neutral (not greenish or pinkish)
- Observe skin tones they should not look pale or over-saturated
- Watch a nature video grass should look natural, not neon
If everything looks balanced across different apps, your RGB calibration is stable.
Advanced Insight: Why RGB Balance Affects Everything
When RGB channels are imbalanced:
- Whites shift tone
- Contrast perception changes
- Shadow detail gets distorted
- Photo colors lose realism
Balanced RGB ensures:
- Consistent white balance
- Accurate sRGB color reproduction
- Reduced eye strain
- Natural-looking images and video
Even small 1% changes can noticeably alter color perception.
RGB Calibration and OLED vs LCD Panels
OLED displays:
- More vibrant
- Slightly more sensitive to red dominance over time
- Require minimal adjustment
LCD displays:
- More stable whites
- Sometimes appear slightly cooler by default
Understanding panel behavior prevents unnecessary corrections.
Pro-Level Best Practice for RGB Calibration Android
Calibrate under natural daylight conditions.
Keep brightness at mid-level.
Take short breaks between adjustments.
Stop once whites look neutral don’t chase “perfect.”
Professional calibration aims for balance, not exaggeration.
If done properly, RGB calibration Android gives you:
- Precise tint correction
- Improved visual realism
- Better photo accuracy
- More consistent color across apps
Fix Screen Tint Android Without Root Access (Fast Recovery & Safe Reset Methods)
If your screen looks yellowish, brownish, or slightly reddish even after adjusting white balance, you can fix screen tint Android issues without rooting your device or installing risky third-party apps. In most cases, tint problems are caused by display mode conflicts, color filters, adaptive settings, or minor software glitches not hardware damage. The key is to reset smartly and isolate the real cause step by step.
Below is the safest and most effective recovery process.
Quick Fix Checklist (90% Problems Solved Here)
Before doing anything advanced, try this sequence:
- Disable Night Light / Eye Comfort Mode
- Turn off Bedtime Mode color adjustments
- Set Display Mode to Natural
- Reset white balance slider to center
- Restart your device
Test immediately after restart using a white background.
If tint disappears the issue was software-level.
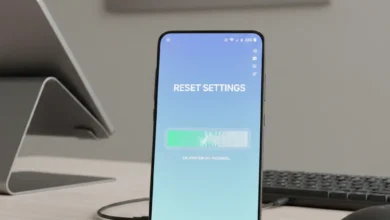
Reset Display Settings Properly (Without Factory Reset)
Many users jump straight to factory reset. That’s unnecessary.
Instead:
- Go to Settings → Display
- Switch screen mode (Vivid → Natural or vice versa)
- Revert white balance to default
- Turn off adaptive color or AI display enhancements
- Restart device
Switching modes forces Android to reload the display profile.
Safe Mode Test – Identify Third-Party App Interference
Some apps modify display color silently (blue light filters, reading apps, screen dimmers).
To test:
- Boot into Safe Mode
- Check if tint persists
If screen looks normal in Safe Mode →
A third-party app is causing the tint.
Remove recently installed display or theme apps.
Clear System Cache (For Post-Update Tint Issues)
If tint appeared after a software update:
- Minor display profile bugs can occur.
- Clearing system cache can help stabilize color rendering.
Restart device into recovery mode and clear cache partition (not data).
This does not erase personal files.
Factory Reset vs Display Reset – Know the Difference
Display Reset:
Reverts color settings only.
Factory Reset:
Erases entire phone.
Do factory reset only if:
- Tint persists in Safe Mode
- RGB adjustments don’t respond
- Issue appeared after major OS upgrade
Even then, test before assuming hardware failure.
When It’s Actually a Hardware Issue
Rare, but possible if:
- Tint remains identical across all modes
- Appears even during boot logo
- Visible uneven discoloration patches
- OLED burn-in signs
In that case, calibration will not fix it.
Professional inspection may be needed.
Why Root Apps Are Not Recommended
Many “screen calibration” apps claim advanced fixes.
Reality:
- Most just overlay color filters
- They do not change actual panel calibration
- They may reduce brightness and distort contrast
Stick to built-in Android calibration tools for real correction.
Best Practice Recovery Flow
If you want a structured method:
Step 1 → Disable filters
Step 2 → Reset display mode
Step 3 → Test white balance
Step 4 → Boot Safe Mode
Step 5 → Clear cache
Step 6 → Factory reset (last resort)
Follow in order not randomly.
Final Result You Should Expect
After properly fixing screen tint Android issues:
- Whites appear neutral
- Greys look balanced
- Skin tones look natural
- No yellow, red, or brown cast
- Display feels consistent across apps
If calibration responds to changes, your panel is healthy.
Vivid Mode vs Natural Mode – Which One Should You Choose for Accuracy and Eye Comfort.?
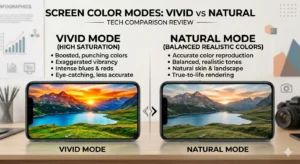
When calibrating your display, choosing between Vivid mode vs Natural mode directly affects color accuracy, eye comfort, and overall visual balance. Vivid mode boosts saturation and contrast to make colors look more intense, while Natural mode aims for realistic, balanced tones closer to sRGB standards. If your goal is proper screen color calibration and neutral white balance on Android, understanding this difference is critical before adjusting sliders or RGB channels.
Most tint complaints actually begin with the wrong screen mode selection.
What Vivid Mode Really Does
Vivid mode:
- Increases color saturation
- Boosts contrast
- Enhances perceived sharpness
- Makes whites appear brighter
- Can exaggerate reds and greens
It is designed for visual impact, not accuracy.
This is why users often report:
- Screen looks reddish
- Colors feel “too strong”
- Whites look slightly warm
Vivid mode can amplify minor calibration imbalances.
What Natural Mode Actually Delivers
Natural mode:
- Keeps colors balanced
- Reduces oversaturation
- Maintains neutral white base
- Aligns closer to sRGB color profile
- Provides more consistent tone across apps
If you are adjusting white balance Android settings, Natural mode is usually the safest starting point.
It prevents overcorrection.
Which Mode Is Better for Screen Color Calibration.?
For accurate calibration:
- Start with Natural mode
- Adjust white balance slightly
- Only switch to Vivid if display feels too flat
Natural mode provides a stable baseline.
Vivid mode can hide or exaggerate tint issues.
If your screen looks yellowish Android users should first test Natural mode before adjusting sliders.
Vivid Mode for Gaming & Media
There are cases where Vivid mode is useful:
- Outdoor use under sunlight
- Gaming with vibrant graphics
- Watching colorful content
- Social media browsing
It enhances visual punch but sacrifices realism.
Use it intentionally not as default calibration setting.
Natural Mode for Reading, Editing & Daily Comfort
Natural mode is better for:
- Long reading sessions
- Content creation
- Photo editing
- Accurate skin tone viewing
- Reduced eye strain
Overly saturated displays can cause visual fatigue over time.
Balanced calibration improves long-term comfort.
Eye Strain and Color Temperature Connection
Many users think brightness causes eye strain.
Often, it’s excessive saturation or incorrect white balance.
If your display feels uncomfortable:
- Switch to Natural mode
- Slightly warm the white balance at night
- Keep brightness moderate
Color balance affects comfort more than most people realize.
How to Test Which Mode Is Right for You
Open:
- A white background
- A natural face photo
- A grey image
- A colorful landscape
Switch between Vivid and Natural.
Ask yourself:
- Does white look neutral?
- Do skin tones look realistic?
- Does anything look exaggerated?
Choose the mode that feels balanced not dramatic.
Final Recommendation
For most users calibrating screen color Android settings:
- Start with Natural
- Fine-tune white balance
- Avoid extreme cool or warm settings
- Use Vivid only when needed
Calibration is about accuracy and stability not maximum brightness or color intensity.
Technical Deep Dive – Color Temperature, Gamma & Display Profiles (Authority-Level Understanding)

If you truly want to understand How to Calibrate Screen Color & White Balance on Android Devices, you need to go beyond sliders and modes. Real display accuracy depends on three core technical factors: color temperature (Kelvin), gamma curve, and display color profile (such as sRGB or AMOLED gamut). These are the invisible systems working behind your screen settings.
Understanding them prevents guesswork and overcorrection.
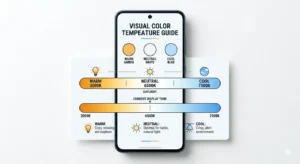
What Is Color Temperature in Kelvin (K).?
Color temperature measures how warm or cool white appears, expressed in Kelvin (K).
- 3000K → Warm yellowish white
- 5000K → Neutral warm daylight
- 6500K → True neutral white (D65 standard)
- 7500K+ → Cool bluish white
Most calibrated displays aim for 6500K, which represents natural daylight white. This is the same standard used in photography, professional monitors, and sRGB calibration.
When your Android display looks yellowish, it’s usually set closer to 5000K or below.
When it looks too blue, it may be above 7000K.
White balance sliders simulate Kelvin adjustment even if they don’t show numbers.
What Is Gamma in Display Calibration.?
Gamma controls how brightness transitions between dark and light tones. It affects shadow detail, midtone contrast, and overall depth perception.
If gamma is too high:
- Shadows look crushed
- Image appears overly contrasty
If gamma is too low:
- Display looks flat
- Dark areas lose depth
Most Android devices are tuned around 2.2 gamma, which is standard for digital displays.
While Android doesn’t let you manually change gamma easily, screen modes (Vivid vs Natural) indirectly influence gamma curves.
That’s why switching modes can change perceived contrast.
sRGB vs AMOLED Color Gamut – Why It Matters
sRGB is the standard color space used for most online content, websites, and photos. It prioritizes realistic and balanced color reproduction.
AMOLED displays can reproduce a wider color gamut than sRGB. This means they can show more vibrant colors but without proper calibration, they may oversaturate reds and greens.
In Vivid mode, AMOLED often exceeds sRGB limits.
In Natural mode, it usually clamps closer to sRGB accuracy.
If your goal is accurate white balance Android calibration, staying closer to sRGB behavior is better.
Why Display Panels Shift Over Time
Even high-quality panels change slightly over months or years.
OLED panels:
- Organic materials age unevenly
- Blue pixels degrade faster
- Slight warm shift may appear
LCD panels:
- Backlight consistency changes
- Less dramatic but still possible shifts
This is normal aging not necessarily a defect.
Minor recalibration restores balance.
Adaptive Display & AI Color Enhancements
Modern Android devices include:
- Adaptive Color
- AI display enhancement
- Dynamic tone mapping
These features analyze content and adjust color automatically.
While useful, they can interfere with manual calibration.
- If you want stable white balance:
- Disable adaptive display temporarily
- Calibrate manually
- Then re-enable only if needed
Consistency matters more than dynamic boosting.
How All These Factors Work Together
Color temperature affects white tone.
Gamma affects contrast depth.
Color profile affects saturation and realism.
When properly balanced:
- Whites appear neutral (around 6500K equivalent)
- Contrast feels natural (gamma around 2.2 behavior)
- Colors look realistic (closer to sRGB range)
This combination produces comfortable, accurate viewing.
Why Technical Understanding Improves Calibration Accuracy
Without understanding Kelvin, gamma, and color profiles, users tend to:
- Overcool the screen
- Push saturation too far
- Misinterpret natural tones as “dull”
- Confuse brightness with color accuracy
When you know the science, you calibrate with intention not emotion.
Manufacturer-Specific Calibration Differences (Samsung, Sony, Pixel & Others)
Not all Android devices handle screen color and white balance the same way. Even if two phones use similar display panels, manufacturers apply different color tuning, display profiles, and calibration controls. That’s why understanding brand-specific calibration behavior helps you avoid overcorrecting or chasing settings that don’t exist on your device.
If you truly want to master How to Calibrate Screen Color & White Balance on Android Devices, you must adapt your approach based on the manufacturer.
Samsung Devices – Advanced Control but Easy to Overdo
Samsung Galaxy phones typically offer the most user control:
- Vivid / Natural modes
- White balance slider
- Manual RGB calibration
- Eye Comfort Shield
Samsung AMOLED displays are vibrant by design. In Vivid mode, they often exceed sRGB color space, making reds and greens more intense.
Best practice for Samsung:
- Start with Natural mode
- Adjust white balance slightly
- Use RGB sliders only if tint persists
- Avoid extreme Vivid tuning
Samsung gives power but too much adjustment can quickly distort color accuracy.
Sony Xperia – Precision-Focused White Balance
Sony devices are known for closer-to-neutral default calibration.
They often include:
- Detailed white balance control
- RGB sliders
- Creator mode (on premium models)
Sony typically targets more accurate color reproduction out of the box.
Best practice for Sony:
- Make minimal adjustments
- Test before changing RGB
- Use white balance slider gently
Sony users often need less calibration compared to other brands.
Google Pixel – Simpler but Balanced
Pixel devices usually provide:
- Natural
- Adaptive
- Boosted (older models)
Pixel displays are tuned closer to accurate sRGB standards by default.
They offer limited manual RGB control.
Best practice for Pixel:
- Switch to Natural for accuracy
- Disable Adaptive if tint fluctuates
- Avoid third-party filter apps
If tint appears on Pixel, it’s often Night Light related not calibration failure.
OnePlus & Xiaomi – Aggressive Color Enhancement by Default
Some OnePlus and Xiaomi devices use:
- Vivid / Brilliant modes
- Adaptive display AI
- Custom color scheme sliders
These brands often prioritize punchy visuals over strict accuracy.
Users frequently report:
- Slight yellow tint
- Overly saturated reds
- Skin tone exaggeration
Best practice:
- Choose Standard / Natural mode
- Disable enhanced contrast
- Calibrate under daylight
These devices respond well to mild white balance correction.
Budget Android Devices – Limited Calibration Options
Lower-cost Android phones may only offer:
- Night Light toggle
- Basic display mode switch
- No RGB control
If tint appears here:
- Reset display mode
- Update software
- Check Safe Mode
Hardware quality variation is more common in budget panels, so extreme perfection may not be achievable.
Why Brand Differences Matter in Calibration
Every manufacturer applies:
- Different gamma tuning
- Different default Kelvin values
- Different saturation scaling
- Different AI display enhancements
That’s why copying someone else’s slider numbers rarely works.
Calibration must match:
- Your panel type
- Your software version
- Your manufacturer’s tuning philosophy
Quick Brand-Specific Calibration Summary
Samsung: Powerful controls, avoid over-tuning
Sony: Already accurate, adjust minimally
Pixel: Simple, stable, disable adaptive if needed
OnePlus/Xiaomi: Reduce saturation first
Budget Devices: Focus on white balance basics
Understanding your brand behavior saves time and prevents unnecessary RGB adjustments.
Best Display Calibration Settings for Daily Comfort & Accuracy

The best display calibration settings on Android depend on how you use your phone but for most users, a neutral white balance, Natural screen mode, and moderate brightness deliver the most accurate and comfortable experience. The goal isn’t extreme vibrancy or ultra-cool whites. It’s balance, stability, and reduced eye strain.
Below are optimized calibration setups based on real-world usage scenarios.
Best Balanced Settings for Everyday Use
If you use your phone for browsing, messaging, social media, and videos:
- Screen Mode → Natural
- White Balance → Center (slightly cool if yellowish)
- Brightness → 40–60% indoors
- Night Light → Off during day
- Adaptive Display → Optional (if stable)
This setup keeps whites neutral and colors realistic without oversaturation.
Everyday viewing should feel comfortable not dramatic.
Best Settings for Gaming
Gaming benefits from higher contrast and color punch but without distorting whites.
Recommended:
- Screen Mode → Vivid (moderate tuning)
- White Balance → Slightly cool
- Brightness → Adjust based on environment
- Disable aggressive blue light filters
Avoid pushing RGB sliders heavily. Oversaturation may look good initially but reduces long-term comfort.
Best Settings for Photo Editing & Content Creation
If you care about color accuracy:
- Screen Mode → Natural
- White Balance → Neutral midpoint
- Disable Adaptive Color
- Avoid Vivid mode
- Calibrate under daylight
For creators, accurate white matters more than bright white.
Natural calibration ensures skin tones and shadows appear realistic.
Best Settings for Reading & Eye Comfort
For long reading sessions:
- Screen Mode → Natural
- White Balance → Slightly warm at night
- Night Light → On after sunset
- Brightness → Low to mid
Warm tone reduces blue light strain but use it intentionally, not permanently.
During daytime, return to neutral white balance.
How Calibration Affects Battery Life
Many users don’t realize:
- Higher brightness consumes more battery
- Vivid mode may increase OLED power usage
- Cooler whites on OLED can increase blue pixel strain
Balanced calibration improves:
- Power efficiency
- Panel longevity
- Visual comfort
Extreme settings cost more energy.
The “Perfect” Calibration Rule
There is no universal slider number.
Perfect calibration means:
- Whites look clean
- Greys look neutral
- Skin tones look natural
- Nothing feels exaggerated
- Eyes don’t feel strained
If you stop noticing the screen that’s successful calibration.
Simple Daily Calibration Maintenance Tip
Every few months:
- Recheck white balance
- Disable filters temporarily
- Compare against white paper in daylight
- Reset if needed
Display panels age slightly over time. Minor adjustments restore balance.
Android Display Calibration Troubleshooting Matrix (Advanced Fix Guide)
Even after following proper steps for How to Calibrate Screen Color & White Balance on Android Devices, some users may still notice minor tint inconsistencies. Instead of randomly adjusting sliders again, use this structured troubleshooting matrix. It helps you identify the root cause logically and apply the correct fix without overcorrecting.
Calibration works best when diagnosis is precise.
Problem → Cause → Correct Fix
1: Screen Still Looks Yellow After Calibration
Likely Causes:
- Night Light still active in background schedule
- White balance set too warm
- OLED slight warm shift over time
- Adaptive display reapplying warm tone
Fix:
- Disable scheduled Night Light
- Move white balance slightly toward cool (1–2 steps only)
- Switch to Natural mode
- Restart device
If the tint reduces when switching modes, it’s software not hardware.
2: Screen Looks Reddish or Over-Saturated
Likely Causes:
- Vivid mode exaggerating reds
- RGB red channel too high
- AI color enhancement active
Fix:
- Switch to Natural mode
- Reduce red slider slightly
- Disable adaptive color enhancement
- Clear display settings cache (if post-update issue)
Avoid adjusting green and blue simultaneously.
3: Grey Background Looks Greenish or Pinkish
Likely Causes:
- Uneven RGB balance
- Over-adjusted blue channel
- Ambient lighting affecting perception
Fix:
- Reset RGB sliders to default
- Calibrate under daylight
- Adjust one channel at a time
- Compare with neutral grey image
Grey is the best indicator of accurate calibration.
4: Tint Changes Automatically Throughout the Day
Likely Causes:
- Adaptive display
- Eye comfort scheduling
- True tone–style dynamic adjustment
Fix:
- Disable adaptive color
- Turn off scheduled color shifts
- Lock brightness manually while testing
Consistency is required for stable white balance.
5: Display Looks Fine in One App but Off in Another
Likely Causes:
- App-specific color profiles
- HDR video playback
- Dynamic contrast rendering
Fix:
- Test with static images
- Compare screenshots across apps
- Disable video enhancement features
Some media apps apply separate color processing.
6: Tint Appears Even During Boot Logo
Likely Causes:
- Panel-level color aging
- Burn-in (OLED)
- Hardware imbalance
Fix:
- Enter Safe Mode
- Perform display reset
- If unchanged → hardware inspection
If tint appears before Android fully loads, software calibration cannot correct it.
7: Calibration Changes Don’t Respond at All
Likely Causes:
- System bug after update
- Corrupted display profile
- Hidden color filter app
Fix:
- Restart device
- Clear system cache
- Test in Safe Mode
- Factory reset (last option only)
Always test before assuming display damage.
Golden Rule of Calibration Troubleshooting
If the tint changes when you adjust settings →
Your panel is healthy.
If tint never changes under any setting →
Investigate hardware.
Calibration is responsive when software-based.
Final Stability Checklist
After resolving tint:
- White appears neutral
- Grey looks balanced
- Skin tones look realistic
- No sudden color shift
- Eye comfort feels improved
When these conditions are met, your Android display calibration is complete and stable.
FAQs:
Q: Why does my Android screen look yellowish.?
Your Android screen usually looks yellow because Night Light, Eye Comfort Mode, or a warm white balance setting is enabled. Disabling these features and adjusting the white balance slider toward neutral typically fixes the issue within minutes.
Q: How do I fix screen tint on Android without root.?
You can fix screen tint without root by switching to Natural display mode, resetting white balance to default, disabling adaptive color features, and restarting your device. Most tint issues are software-related and don’t require advanced tools.
Q: What is the ideal white balance setting on Android.?
The ideal white balance is close to neutral daylight (around 6500K equivalent). Since most Android devices don’t show Kelvin values, keeping the white balance slider near the center usually provides accurate results.
Q: Should I use Vivid or Natural mode for accurate colors.?
Natural mode is better for accurate colors because it follows a more balanced color profile similar to sRGB. Vivid mode increases saturation and contrast, which can distort white balance and exaggerate reds.
Q: Can RGB calibration damage my screen.?
No, RGB calibration does not physically damage your screen. However, extreme slider adjustments can distort color accuracy and create unnatural tones. Always adjust in small increments.
Q: Why does my screen color change automatically.?
Automatic color changes usually happen because Adaptive Display, Night Light scheduling, or AI-based color enhancement is enabled. Disabling these features stabilizes white balance.
Q: Does screen calibration improve battery life.?
Proper calibration can slightly improve battery efficiency, especially on OLED devices, because extreme brightness and over-saturated modes consume more power. Balanced settings are more energy-efficient.
Q: Why does my display look different after a software update.?
Software updates can reset display profiles, modify gamma tuning, or re-enable adaptive color features. Rechecking white balance and screen mode usually restores normal color.
Q: How do I know if my screen has a hardware problem.?
If tint appears during the boot logo, does not change when adjusting settings, and remains identical in Safe Mode, the issue may be hardware-related rather than calibration-related.
Q: Can third-party calibration apps improve display accuracy.?
Most third-party apps only apply screen overlays instead of true panel calibration. Built-in Android display controls are more effective and safer for accurate white balance adjustments.
Conclusion:
Calibrating your display is not about making colors “pop” it’s about making them correct. When you understand How to Calibrate Screen Color & White Balance on Android Devices, you stop guessing and start adjusting with purpose. A properly calibrated screen delivers neutral whites, balanced greys, accurate skin tones, and a comfortable viewing experience that doesn’t strain your eyes.
Most tint issues yellowish screens, reddish tones, dull greys are software-related. With the right process, you can fix them using built-in Android tools without rooting your device or installing unreliable apps. The key is structured calibration:
- Start with Natural mode
- Adjust white balance in small increments
- Use RGB only when necessary
- Calibrate under neutral daylight
- Avoid extreme slider positions
Understanding technical fundamentals like Kelvin temperature (around 6500K neutral), gamma balance, and sRGB color behavior gives you control not trial and error.
A well-calibrated display improves:
- Visual comfort
- Content accuracy
- Gaming clarity
- Photo realism
- Long-term panel consistency
When your screen stops distracting you and starts feeling natural, that’s when calibration is successful.
Proper calibration is subtle. Balanced. Stable.
And now, you know exactly how to achieve it.
Also Read:
- How to Calibrate iPhone 12 | Complete Step-by-Step Guide to Fix Issues & Boost Performance
- 20 ways | How To Fix Android Phone Touch Screen Problem |
- How to Calibrate Samsung S22 Screen | 12 Proven Fixes Guide
- How to Calibrate Samsung S22
- How to Reset Samsung S22 for Calibration
- Why Is My Monitor Color Calibration Not Working
- Monitor Calibration Explained
- Monitor Color Calibration | Fixes, AI Tools & Pro Hacks
- Fix iPhone 11 Touch Screen Not Working Fast