Fixing Touchscreen Issues & Calibration on Android | 11 Proven Fixes
Discover simple methods for fixing touchscreen issues & calibration on Android and bring back smooth, precise touch performance
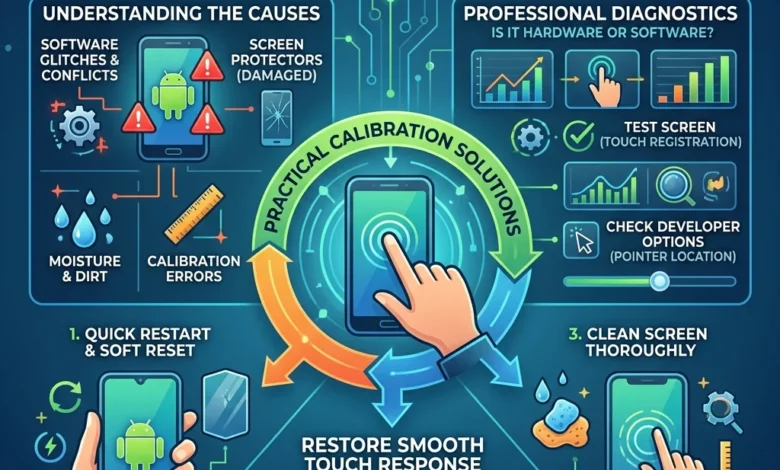
Fixing Touchscreen Issues & Calibration on Android starts with understanding why your phone suddenly stops responding, taps the wrong area, or registers ghost touches. Most touchscreen problems are not permanent hardware failures they usually happen because of software glitches, screen protectors, calibration errors, moisture interference, or background system conflicts.
If your Android screen feels slow, inaccurate, or completely unresponsive, the good news is that many touchscreen problems can be diagnosed and fixed with the right calibration and troubleshooting steps. In this guide, we will break down the real causes, professional diagnostics, and practical calibration solutions so you can restore smooth touch response without wasting time on random fixes.
Fixing Touchscreen Issues & Calibration on Android
Fixing touchscreen issues & calibration on Android involves identifying the root cause of touch problems and applying the correct solutions to restore accurate touch response. Touchscreen issues may appear as delayed taps, ghost touches, unresponsive areas, or inaccurate gestures. These problems can occur due to software glitches, screen interference, outdated system updates, or hardware-related faults within the touchscreen digitizer.
Android smartphones use capacitive touchscreen technology to detect electrical signals from your fingers. When this system becomes misaligned or affected by software bugs, the device may not register touch input correctly. In such situations, calibrating the touchscreen or applying troubleshooting methods can help restore normal functionality.
One of the first steps in fixing touchscreen issues is performing simple checks such as cleaning the screen, restarting the device, or removing a faulty screen protector. Sometimes, third-party apps or background processes can also interfere with the touchscreen, causing lag or incorrect touch detection. Running the phone in Safe Mode can help determine whether an installed application is responsible for the problem.
Touchscreen calibration is another useful method for improving touch accuracy. Calibration tools help the device recognize touch input more precisely by resetting the touch sensitivity parameters. This process can resolve issues like misaligned taps, delayed responses, or uneven touch sensitivity across the screen.
In addition, keeping the Android system updated is important because manufacturers often release software patches and touchscreen driver improvements through system updates. Installing these updates ensures better compatibility between hardware sensors and the operating system.
Overall, fixing touchscreen issues & calibration on Android requires a combination of basic troubleshooting, software optimization, and preventive device care. By understanding how touchscreen technology works and applying the right fixes, users can restore smooth touch performance and extend the lifespan of their Android device.
Why Android Touchscreen Problems Happen (Root Causes Explained)
Android touchscreen problems usually happen when the digitizer layer misreads touch input, either because of software bugs, damaged screen protectors, moisture interference, or failing hardware sensors. Before trying calibration or repair, understanding the root cause is essential because different issues require completely different fixes.
Modern Android phones use capacitive touchscreens, which detect electrical signals from your fingers. When something interrupts this signal like dirt, water, system glitches, or calibration errors the device may start behaving abnormally. This can lead to problems such as touch lag, ghost touches, inaccurate taps, or dead zones on the display.
Many users immediately assume their screen is broken, but in reality a large percentage of touchscreen issues are temporary software conflicts or environmental interference. Android updates, overloaded system resources, or poorly optimized apps can also affect how the touchscreen controller processes input signals.
Understanding the difference between temporary touch errors and real hardware failures is the first step toward fixing the problem efficiently. Once the cause is identified, solutions like touchscreen calibration, system optimization, or hardware diagnostics become much more effective.
Common Android Touchscreen Problems Users Experience
Touchscreen problems can appear in several ways, and recognizing the exact symptom helps narrow down the cause quickly. Some of the most common issues Android users report include:
• Touchscreen not responding – taps are ignored or require multiple attempts
• Ghost touches – the screen presses buttons by itself without user input
• Touch lag – noticeable delay between tap and response
• Dead zones – certain areas of the screen stop detecting touches
• Inaccurate touch detection – taps register in the wrong location
Each of these problems usually points to a specific category of issues, such as software instability, calibration errors, environmental interference, or hardware damage.
How Capacitive Touchscreens Detect Your Finger
Android smartphones rely on capacitive touchscreen technology, which works by detecting electrical changes when your finger touches the display. Beneath the glass layer is a digitizer grid that measures tiny electrical variations across the screen.
When you touch the screen, your finger changes the electrical field in that area. The device’s touch controller processes this data and translates it into coordinates, allowing apps and the operating system to respond instantly.
However, if the electrical signal becomes unstable because of moisture, thick screen protectors, or damaged sensors the system may misinterpret touch inputs. This is why problems like ghost touches or inaccurate taps sometimes appear suddenly.
Temporary Touchscreen Issues vs Hardware Failure
One of the biggest mistakes users make is assuming every touchscreen problem means the screen is broken. In reality, many issues are temporary and can be fixed without replacing the display.
Temporary issues usually include:
• software bugs after Android updates
• corrupted system cache
• screen protector interference
• background apps causing system overload
• moisture or dirt on the display
Hardware failures usually show signs like:
• permanent dead zones on the screen
• cracks affecting touch response
• random ghost touches even after factory reset
• touchscreen completely unresponsive
Distinguishing between these two categories helps determine whether the solution should be simple calibration, software troubleshooting, or professional hardware repair.
Quick Diagnostic Tests Before Fixing Touchscreen Issues on Android
Before attempting touchscreen calibration or repair, you should first run a few quick diagnostic tests to determine whether the problem is caused by software conflicts, display interference, or hardware damage. These tests help isolate the real issue so you don’t waste time performing unnecessary fixes. In many cases, simple diagnostics like Safe Mode testing, screen responsiveness checks, and touch accuracy tests can reveal whether the issue is caused by third-party apps, system glitches, or digitizer hardware failure.
Modern Android devices process thousands of touch inputs per minute. If something interrupts the input system such as background apps, corrupted cache files, or display overlays the touchscreen may behave unpredictably. Running diagnostic checks allows you to confirm whether the problem is temporary software interference or a deeper hardware issue.
Professional technicians always begin with diagnostics because they save time, prevent unnecessary resets, and reveal the true cause of the problem quickly. These simple tests take only a few minutes but can dramatically improve the accuracy of the troubleshooting process.
Test Touchscreen Responsiveness Across the Entire Display
The first step in diagnosing touchscreen issues is checking whether the entire screen responds consistently to touch input. Sometimes only specific areas of the display stop responding, which indicates a localized digitizer issue rather than a full system problem.
To test responsiveness:
- Open the Notes app or drawing app on your phone.
- Drag your finger slowly across the screen.
- Observe whether the line breaks or stops responding in certain areas.
If the line disappears or skips in a specific area, the device may have dead zones on the digitizer layer, which usually points to hardware damage or pressure points beneath the display. However, if the problem appears randomly across the screen, the cause is more likely software instability or calibration errors.
Use Android Safe Mode to Detect App Conflicts
Many touchscreen problems are actually caused by third-party apps interfering with the Android input system. Apps that use display overlays, gesture controls, or screen filters can sometimes disrupt the touchscreen’s ability to process taps accurately.
To test this:
- Hold the Power button.
- Tap and hold Restart.
- Select Reboot into Safe Mode.
Safe Mode temporarily disables all third-party apps. If the touchscreen works perfectly in Safe Mode, it means one of your installed apps is causing the problem. Removing recently installed apps often resolves the issue quickly.
Check Screen Protector and Physical Surface Interference
Many users overlook this simple cause: screen protectors and dirt can interfere with capacitive touch signals. Thick tempered glass protectors, poorly aligned protectors, or air bubbles can cause touch delays and inaccurate tap detection.
You should check for:
• cracked or damaged screen protectors
• dust trapped under the protector
• moisture or oil on the screen surface
• gloves or accessories interfering with touch input
Cleaning the screen with a soft microfiber cloth or temporarily removing the screen protector can immediately restore normal touchscreen behavior in many cases.
Run Built-in Android Touchscreen Test Tools
Some Android manufacturers include hidden diagnostic menus that allow you to test touchscreen functionality directly. These tools display touch coordinates and verify whether the digitizer is detecting input accurately across the screen.
Examples include:
• Samsung diagnostic menu: *#0*#
• built-in device tests in Samsung Members app
• third-party touchscreen test apps from the Play Store
These tests help confirm whether the screen registers every touch input correctly. If the test shows missing touch points, ghost inputs, or inconsistent response areas, the issue may require calibration or hardware repair.
Why These Diagnostics Matter Before Calibration
Running these quick tests ensures you don’t misdiagnose the problem. Many users jump straight to factory resets or screen replacements when the real cause could be a single malfunctioning app or a faulty screen protector.
By identifying the exact source of the issue first, you can apply the correct solution whether that means touchscreen calibration, software optimization, or hardware repair.
How to Fix Touchscreen Not Responding on Android (Step-by-Step Solutions)
If your Android touchscreen is not responding, the problem can often be fixed by restarting the device, clearing system cache, removing screen interference, updating software, or recalibrating the touch input system. These step-by-step solutions target the most common causes of touchscreen failure, including software glitches, memory overload, and misconfigured system settings.
Touchscreen issues rarely appear without a reason. Sometimes the operating system temporarily stops processing touch signals due to system overload, background app conflicts, or temporary sensor glitches. Fortunately, Android provides several built-in solutions that can restore normal touchscreen performance without requiring professional repair.
Below are the most effective troubleshooting methods used by technicians and Android support teams to restore touchscreen responsiveness.
Restart Your Phone to Reset the Touch Controller
The simplest solution is often the most effective. Restarting your device resets the touch controller, system memory, and background processes that might be interfering with touchscreen input.
To restart your Android device:
- Press and hold the Power button.
- Tap Restart or Reboot.
- Wait for the phone to fully restart.
When the device powers back on, the operating system reloads all input drivers and clears temporary system conflicts. Many touchscreen problems disappear after a restart because the touch driver and system processes refresh automatically.
If your screen is completely frozen, you can perform a force restart by holding the Power button for about 10–15 seconds until the phone reboots.
Clean the Screen and Remove Any Physical Interference
Capacitive touchscreens rely on electrical conductivity from your finger. Dirt, oil, moisture, or a damaged screen protector can interrupt the electrical signal and cause inaccurate or delayed touch responses.
To eliminate surface interference:
• Wipe the screen with a dry microfiber cloth
• Remove thick or poorly installed screen protectors
• Make sure your fingers are clean and dry
• Avoid using the device with gloves that block capacitive input
In many cases, touchscreen responsiveness improves immediately once the screen surface is clean and free from interference.
Close Background Apps That May Be Causing System Lag
Android phones sometimes experience touchscreen delays when too many apps are running in the background. These apps consume RAM and processing power, which can slow down how quickly the device processes touch input.
To close background apps:
- Tap the Recent Apps button.
- Swipe away apps you are not using.
- Clear memory if your device has a RAM cleaner or device care feature.
Reducing system load allows the operating system to process touch commands more efficiently, which can significantly improve responsiveness.
Update Your Android Software
Software bugs are a common cause of touchscreen issues. Manufacturers frequently release system updates that fix input lag, touch sensitivity problems, and driver bugs.
To check for updates:
- Open Settings
- Tap Software Update
- Select Download and Install
Installing the latest Android update ensures your phone is running the most stable version of the touch drivers and system firmware.
Clear System Cache to Remove Corrupted Files
Over time, Android stores temporary files that help apps run faster. However, corrupted cache files can sometimes interfere with touchscreen responsiveness.
Clearing the system cache helps remove these problematic files without deleting personal data.
Steps may vary by device, but generally include:
- Turn off your phone.
- Press and hold Power + Volume Up to enter Recovery Mode.
- Select Wipe Cache Partition.
- Restart the device.
This process refreshes system-level temporary files and often resolves random touchscreen glitches and lag.
Reset Touch Sensitivity Settings (If Available)
Some Android phones include touch sensitivity or glove mode settings. If these settings are incorrectly configured, the touchscreen may become too sensitive or not responsive enough.
To adjust touch sensitivity:
- Open Settings
- Navigate to Display settings
- Look for Touch Sensitivity or Increased Touch Sensitivity
Enabling this option can improve responsiveness when using screen protectors, while disabling it may reduce ghost touches or accidental taps.
Perform a Factory Reset as a Last Resort
If none of the above methods work, a factory reset may be necessary. This process removes all apps, settings, and system conflicts that could be affecting the touchscreen.
Before performing a reset:
• Back up all important files
• Save contacts, photos, and documents
Steps to reset:
- Open Settings
- Go to General Management
- Tap Reset → Factory Data Reset
A factory reset restores the device to its original system configuration, which often resolves persistent touchscreen software issues.
When These Fixes Don’t Work
If the touchscreen still does not respond after trying all these solutions, the issue may involve hardware damage to the digitizer layer or internal touch controller. In such cases, professional repair or screen replacement may be required.
However, before replacing the display, it is worth trying touchscreen calibration methods, which can sometimes restore accuracy when the digitizer becomes misaligned.
How to Calibrate Android Touchscreen for Better Accuracy
To calibrate an Android touchscreen, you typically use built-in calibration settings, system diagnostics, or trusted calibration apps that realign the touch input coordinates with the display grid. Touchscreen calibration helps fix issues like inaccurate taps, delayed response, ghost touches, or misaligned touch points by resetting how the digitizer interprets finger input.
Over time, the touchscreen’s digitizer layer and software touch controller may become slightly misaligned due to system updates, heavy usage, or sensor drift. When this happens, the phone may register touches slightly above, below, or beside where you actually tap. Calibration corrects this mismatch by retraining the device to interpret touch coordinates properly.
Although many modern Android phones auto-calibrate their screens automatically, manual calibration can still improve touch accuracy when problems appear.
Check if Your Android Phone Has Built-In Touchscreen Calibration
Some Android manufacturers include hidden calibration or diagnostic tools that allow users to test and recalibrate touch input directly. These built-in tools communicate with the phone’s touch controller firmware, making them the most reliable calibration method.
You can check for calibration tools by:
- Opening Settings
- Searching for Touch Sensitivity or Touch Calibration
- Looking inside Accessibility or Display settings
Certain devices also include diagnostic menus that can test touch accuracy across the entire display. These menus show whether the screen detects every touch point correctly.
If your phone provides this option, running the calibration process can significantly improve touch precision and responsiveness.
Calibrate Touchscreen Using Android Diagnostic Menu
Many Android phones support hidden hardware test menus used by technicians to diagnose touchscreen behavior. These menus allow you to test touch input and verify whether the digitizer grid responds correctly across the display.
A common method includes:
- Open the Phone dialer
- Enter the diagnostic code:
*#0*#(works on many devices) - Select the Touch Test option
During the test, you drag your finger across the screen while the system records touch coordinates. If the phone detects every touch point smoothly, the touchscreen hardware is working correctly. If some areas fail to register input, the digitizer may require recalibration or hardware repair.
Use Trusted Touchscreen Calibration Apps
If your phone does not include built-in calibration tools, you can use touchscreen calibration apps designed to reset touch accuracy. These apps analyze how your screen responds to taps, swipes, and gestures, then adjust the input sensitivity accordingly.
Typical calibration apps guide you through a short process:
• tapping specific points on the screen
• performing swipe gestures
• testing multi-touch accuracy
After completing the process, the app updates the system configuration so the touchscreen can interpret finger input more accurately.
However, it is important to use reliable apps from trusted developers, since some low-quality apps may not actually perform real calibration.
Restart the Device After Calibration
Once the calibration process finishes, restarting the phone is recommended. A restart reloads the touch drivers and system input services, ensuring the new calibration settings are properly applied.
This step helps the system rebuild its touch input cache and digitizer response model, which can significantly improve touch accuracy.
Many users notice immediate improvements such as:
• smoother scrolling
• faster touch response
• fewer ghost touches
• improved tap accuracy
Signs That Touchscreen Calibration Worked
After calibration, you should test the screen to confirm whether the issue has improved. Successful calibration usually results in noticeable improvements in touch performance.
Signs of successful calibration include:
• taps registering exactly where you press
• smoother gesture navigation
• consistent touch response across the entire display
• reduced accidental or ghost touches
If the problem still persists even after calibration, the issue may involve hardware damage to the digitizer layer, which requires further troubleshooting.
Why Touchscreen Calibration Matters
Calibration ensures that the software interpretation of touch input matches the physical screen layout. Without proper calibration, even a perfectly working screen can feel inaccurate or unresponsive.
For users experiencing tap misalignment, touch lag, or inconsistent response, calibration is often one of the most effective ways to restore normal touchscreen performance.
Fixing Ghost Touches on Android Screens
Ghost touches on Android happen when the screen registers taps, swipes, or gestures without the user touching it. This usually occurs because of moisture on the display, damaged screen protectors, charger interference, software glitches, or digitizer malfunctions. Fixing ghost touches requires identifying the exact trigger and eliminating the interference affecting the touchscreen sensor.
Android devices use highly sensitive capacitive touch sensors that detect tiny electrical changes when your finger touches the screen. When something disrupts this electrical field such as water droplets, faulty chargers, or system instability the device may mistakenly interpret random signals as touch input.
Ghost touch issues can appear as apps opening automatically, random typing, screen scrolling by itself, or buttons being pressed without interaction. While these symptoms may look serious, they are often caused by simple environmental or software factors that can be fixed quickly.
Remove Moisture, Dirt, or Oil From the Screen
One of the most common causes of ghost touches is moisture or residue on the display surface. Even small water droplets or oil from fingerprints can interfere with the electrical signal detected by the touchscreen.
To fix this:
• Power off the phone if ghost touches are severe
• Wipe the screen using a clean microfiber cloth
• Remove any liquid, sweat, or dust particles
• Avoid using the device with wet hands
After cleaning the screen, power the phone back on and test whether the random touch activity stops.
Check Your Charger and Charging Cable
Many users notice ghost touches while the phone is charging. This usually happens when a low-quality or damaged charger creates electrical interference that affects the touchscreen digitizer.
Signs of charger-related ghost touches include:
• random touches appearing only while charging
• scrolling or typing by itself during charging
• touchscreen behaving normally after unplugging
To solve this issue:
• switch to the original manufacturer charger
• replace damaged charging cables
• avoid cheap third-party adapters
Stable electrical current prevents interference with the touchscreen controller.
Remove or Replace the Screen Protector
Some thick tempered glass protectors or poorly installed protectors can cause the touchscreen to detect false inputs. Air bubbles, cracks, or poor adhesive alignment may distort the capacitive signal across the display.
You should check for:
• cracked screen protectors
• misaligned protector edges
• air bubbles under the glass
• unusually thick protective layers
If ghost touches disappear after removing the protector, replacing it with a high-quality thin protector usually resolves the issue permanently.
Disable Overlay Apps and Gesture Tools
Certain Android apps run screen overlays or gesture controls that can conflict with the system’s touch input processing. Examples include:
• floating shortcut apps
• screen filter or blue light apps
• gesture navigation tools
• gaming touch enhancement apps
To test this:
- Boot the phone into Safe Mode
- Check if ghost touches stop occurring
- Remove recently installed apps that interact with the display
If the issue disappears in Safe Mode, a third-party app is likely interfering with the touchscreen.
Update System Software and Touch Drivers
Sometimes ghost touches are caused by software bugs in the Android firmware or touch drivers. Manufacturers frequently release updates to improve touchscreen stability and input processing.
To update your device:
- Open Settings
- Tap Software Update
- Select Download and Install
Installing updates ensures your phone runs the latest touchscreen driver optimizations and bug fixes.
Test for Possible Hardware Damage
If ghost touches continue even after cleaning the screen, changing chargers, removing screen protectors, and updating the system, the problem may involve hardware damage to the digitizer layer.
Possible hardware-related causes include:
• cracked internal digitizer
• pressure damage under the screen
• faulty touch controller chip
• liquid damage inside the device
In these cases, the touchscreen may require professional diagnosis or display replacement.
Why Ghost Touch Problems Should Be Fixed Quickly
Ignoring ghost touches can lead to accidental actions such as deleting files, sending unintended messages, or opening apps randomly. Over time, persistent ghost input may also indicate deeper hardware problems.
Identifying the cause early helps prevent further touchscreen instability and potential device damage, ensuring your Android phone remains accurate and reliable during daily use.
Fixing Dead Zones on Android Touchscreens
Dead zones on an Android touchscreen are areas of the screen that stop responding to touch input. This issue usually occurs due to digitizer damage, screen pressure, software glitches, or calibration errors. Fixing dead zones involves diagnosing whether the problem is temporary software interference or a hardware failure in the touchscreen layer.
The touchscreen on modern smartphones works through a digitizer grid placed beneath the display glass. This grid detects electrical signals from your finger and converts them into touch coordinates. When part of this grid stops functioning correctly, the device may fail to register touches in specific areas of the screen.
Dead zones can appear suddenly or develop gradually. Sometimes they are caused by system instability, while other times they indicate physical damage to the screen or internal sensors.
Identify the Exact Location of the Dead Zone
Before attempting a fix, it is important to confirm whether the problem is truly a dead zone or simply temporary touch lag.
You can test the screen by:
- Opening a drawing or note-taking app.
- Dragging your finger slowly across the screen.
- Observing where the line stops appearing.
If the line disappears or skips in a specific area repeatedly, that section of the display may have a non-responsive touch zone. Identifying the exact location helps determine whether the issue is localized hardware damage or a broader system problem.
Restart the Device to Reset Touch Input Services
Sometimes dead zones are caused by temporary system glitches that affect how Android processes touch input. Restarting the phone resets the touch controller and input drivers, which may restore normal screen responsiveness.
To restart your phone:
- Press and hold the Power button.
- Tap Restart.
- Wait for the device to reboot fully.
After restarting, test the screen again to see whether the previously unresponsive area begins working normally.
Remove Screen Protectors and Clean the Display
Improperly installed screen protectors can sometimes create areas where touch input becomes weak or inaccurate. Dust particles trapped between the protector and the display can also interfere with touch detection.
To rule out this possibility:
• Remove the screen protector temporarily
• Clean the screen with a soft microfiber cloth
• Ensure there are no air bubbles or debris
If the dead zone disappears after removing the protector, replacing it with a properly installed protector can prevent the problem from returning.
Update Android Software and System Drivers
Some touchscreen issues are caused by software bugs affecting touch drivers. These bugs may cause parts of the screen to respond incorrectly or stop responding entirely.
To update your device:
- Open Settings
- Go to Software Update
- Tap Download and Install
Updating the system ensures that your phone is running the latest touchscreen firmware improvements and bug fixes.
Calibrate the Touchscreen for Accurate Input
If the touchscreen digitizer becomes slightly misaligned, certain areas of the screen may respond poorly. Running a touchscreen calibration process can help restore accurate input detection.
Calibration typically involves:
• tapping specific points on the screen
• performing swipe gestures
• testing multi-touch responsiveness
This process allows the system to realign touch coordinates with the display grid, which may resolve minor dead zone issues.
Check for Physical Screen Damage
If the dead zone remains after trying software fixes and calibration, the issue may be related to hardware damage in the digitizer layer.
Possible hardware causes include:
• pressure damage from dropping the phone
• cracked internal display layers
• malfunctioning touch controller circuits
• liquid exposure affecting the digitizer
In such cases, the most reliable solution is usually professional screen repair or digitizer replacement.
Why Dead Zones Should Not Be Ignored
Dead zones can gradually expand if the underlying cause is physical damage or failing hardware. Ignoring the problem may make the phone increasingly difficult to use, especially if the affected area overlaps with navigation buttons or keyboard regions.
Diagnosing the issue early helps determine whether the solution is simple calibration, software troubleshooting, or hardware repair, preventing further touchscreen instability.
How to Fix Touchscreen Lag and Delayed Response on Android
Touchscreen lag on Android happens when the device takes longer than normal to register taps, swipes, or gestures. This delay is usually caused by system overload, background apps, outdated software, low memory, or touch driver issues. Fixing touchscreen lag involves optimizing the device’s performance, clearing unnecessary processes, and ensuring the touch input system works efficiently.
Modern Android devices process touch input through a combination of touchscreen hardware (digitizer), system drivers, and the operating system’s input framework. When any of these components becomes overloaded or unstable, the phone may respond slowly to touch commands.
Users experiencing touchscreen lag may notice symptoms such as:
• taps registering after a delay
• slow scrolling or gesture response
• keyboard typing lag
• delayed app interaction
Fortunately, most touchscreen lag issues can be fixed with a few practical optimization steps.
Restart the Device to Clear Temporary System Lag
One of the quickest ways to fix touchscreen delay is restarting the phone. Over time, Android devices accumulate background processes and temporary system cache that can slow down input responsiveness.
Restarting the phone:
• clears temporary system memory
• resets background processes
• reloads touch input drivers
To restart the device:
- Press and hold the Power button
- Tap Restart
- Wait for the system to reboot
After restarting, test the screen to see whether the touch response becomes smoother and faster.
Close Background Apps Consuming System Resources
Too many running applications can overload the device’s CPU and RAM, which may cause touchscreen actions to respond slowly.
When the system struggles to process multiple tasks at once, touch inputs may be queued behind other processes, creating noticeable lag.
To reduce system load:
- Open the Recent Apps menu
- Close unused applications
- Avoid running heavy apps simultaneously
Freeing up system resources allows the phone to prioritize touch input processing, improving responsiveness.
Clear Cache to Improve System Performance
Temporary cache files help apps load faster, but excessive cache accumulation can slow down the system and affect touchscreen performance.
Clearing cache helps remove corrupted or unnecessary temporary files that may interfere with smooth operation.
To clear cache:
- Open Settings
- Go to Storage
- Select Cached Data and clear it
Some devices also allow clearing cache through recovery mode, which can improve overall device performance.
Update Android Software and Touch Drivers
Manufacturers frequently release updates that improve touch input optimization, driver stability, and system performance.
If your device runs outdated software, it may experience touchscreen delays caused by known bugs.
To update your phone:
- Open Settings
- Tap Software Update
- Select Download and Install
Installing updates ensures that your phone benefits from the latest performance improvements and touch responsiveness fixes.
Reduce Screen Animations for Faster Touch Response
Android interface animations can sometimes create the illusion of touchscreen lag, especially on older or mid-range devices.
Reducing animation effects helps the system respond faster to touch commands.
You can adjust animations through Developer Options:
- Open Settings → About Phone
- Tap Build Number seven times to enable Developer Options
- Open Developer Options
- Reduce the following settings:
• Window Animation Scale
• Transition Animation Scale
• Animator Duration Scale
Setting these values to 0.5x or off can significantly improve perceived touchscreen speed.
Check for Hardware or Screen Issues
If touchscreen lag continues even after optimizing the device, the issue may involve hardware problems with the touchscreen digitizer or display controller.
Possible hardware causes include:
• screen damage from drops
• aging touchscreen sensors
• internal connection problems
• liquid damage affecting touch circuitry
In such cases, a professional hardware inspection may be required to fully resolve the problem.
Why Fixing Touchscreen Lag Is Important
A slow touchscreen can make everyday smartphone tasks frustrating, especially when typing messages, scrolling through apps, or navigating menus.
Maintaining smooth touch responsiveness ensures the device operates efficiently, accurately, and comfortably, improving the overall user experience.
How to Fix Android Touchscreen When It Stops Working Completely (Best Practices)
If your Android touchscreen stops working completely, the issue is usually caused by software crashes, system overload, screen protector interference, moisture, or hardware damage to the digitizer. The best way to fix it is to follow a step-by-step troubleshooting process that starts with simple fixes like restarting the device and cleaning the screen, then moves toward deeper solutions such as safe mode testing or system updates.
A completely unresponsive touchscreen can make the phone almost impossible to use, but in many cases the problem is temporary and fixable without repair. Following best practices ensures you diagnose the issue correctly and avoid unnecessary damage to the device.
Perform a Forced Restart
When the touchscreen freezes completely, the system may be experiencing a temporary software crash. A forced restart reloads the operating system and resets the touch controller.
Best practice:
- Press and hold the Power button + Volume Down button for about 10–15 seconds.
- Wait until the device restarts automatically.
- Test whether the touchscreen begins responding again.
A forced reboot clears system memory errors and temporary glitches that may stop the touchscreen from responding.
Remove Screen Protectors and Clean the Display
A damaged or poorly installed screen protector can block touch input signals and make the screen appear completely unresponsive.
Best practice steps:
• Remove any tempered glass or plastic screen protector
• Clean the screen using a soft microfiber cloth
• Ensure there is no moisture, oil, or dust on the display
• Avoid using the device with wet hands
Once the screen is clean, test the touch response again to see if the issue disappears.
Disconnect the Charger and External Accessories
Sometimes touchscreen failure occurs due to electrical interference from faulty chargers or cables.
This is especially common when using low-quality charging adapters.
Best practice:
• Unplug the phone from the charger
• Remove connected accessories (USB devices, OTG cables)
• Test the touchscreen while the device is running on battery power
If the touchscreen works normally after unplugging the charger, replacing the charger may solve the issue.
Boot the Device Into Safe Mode
Third-party applications can sometimes interfere with Android’s touch input system, especially apps that control gestures, overlays, or screen filters.
Booting into Safe Mode temporarily disables all third-party apps.
Best practice process:
- Press and hold the Power button
- Tap and hold Power Off until Safe Mode appears
- Restart the device in Safe Mode
If the touchscreen works normally in Safe Mode, a recently installed app may be causing the problem.
Update Android Software and System Drivers
Outdated firmware may contain touchscreen driver bugs that prevent the display from responding correctly.
Best practice steps:
- Open Settings
- Go to Software Update
- Tap Download and Install
Installing updates ensures your phone runs the latest touchscreen performance improvements and bug fixes.
Perform a Factory Reset (Last Software Solution)
If the touchscreen still does not respond after trying other solutions, performing a factory reset may resolve deeper system corruption.
Best practice warning:
Always backup important data before performing a factory reset.
Factory reset process:
- Open Settings
- Go to System → Reset Options
- Select Erase All Data (Factory Reset)
This step removes corrupted system files that might prevent the touchscreen from functioning.
Inspect for Hardware Damage
If none of the software fixes restore touchscreen functionality, the issue may involve physical damage to the digitizer or internal display components.
Common hardware causes include:
• cracked or pressure-damaged screen
• internal digitizer failure
• liquid damage affecting touch sensors
• loose internal display connectors
In these situations, the best solution is professional repair or screen replacement.
Best Practices to Prevent Future Touchscreen Problems
To keep your Android touchscreen working reliably:
• use high-quality screen protectors
• avoid exposing the phone to water or extreme temperatures
• keep the screen clean and free of residue
• install regular system updates
• avoid using low-quality chargers
These preventative practices help maintain stable touch sensitivity and long-term device performance.
How to Test and Calibrate Android Touchscreen for Accuracy
Testing and calibrating an Android touchscreen helps ensure that taps, swipes, and gestures are detected accurately across the entire display. If the screen feels inconsistent, delayed, or slightly misaligned, running a touchscreen test and performing calibration can improve touch precision and responsiveness.
Modern Android smartphones use a capacitive touchscreen digitizer that detects electrical signals from your fingers. Over time, software updates, screen protectors, or minor system glitches can affect how accurately the device interprets touch input. Testing the screen first allows you to determine whether the issue is software-related or caused by hardware damage.
By following proper testing and calibration steps, users can quickly identify problem areas and restore normal touchscreen functionality.
Run a Basic Touchscreen Test
Before attempting calibration, it is important to verify whether the touchscreen has dead zones, lagging areas, or sensitivity problems.
You can perform a simple manual test by:
- Opening a drawing or note application on the phone.
- Dragging your finger slowly across different parts of the screen.
- Observing whether the line follows your finger smoothly.
If the line breaks, skips, or fails to appear in certain areas, that part of the screen may have a touch sensitivity issue. This test helps confirm whether the problem affects specific regions or the entire display.
Use Android Diagnostic Tools
Many Android phones include hidden diagnostic menus that allow users to test different hardware components, including the touchscreen.
These diagnostic tools can check:
• multi-touch response
• touch accuracy across screen zones
• gesture detection performance
Some manufacturers allow users to access these tools through dialer codes or built-in device testing menus. Running a full touchscreen diagnostic can help identify whether the issue is system-related or hardware-related.
Adjust Touch Sensitivity Settings
Certain Android devices provide touch sensitivity options within system settings. These settings are especially helpful when using tempered glass screen protectors, which may slightly reduce touch responsiveness.
To adjust sensitivity:
- Open Settings
- Tap Display
- Enable Touch Sensitivity (if available)
Increasing touch sensitivity allows the device to detect lighter finger taps more accurately, improving overall responsiveness.
Use Calibration Apps to Realign Touch Input
If touch coordinates feel slightly inaccurate, calibration apps can help retrain the touchscreen system. These apps usually guide users through a process where they tap specific points on the screen.
Calibration apps typically require users to:
• tap the center of displayed targets
• perform swipe gestures
• test multi-touch interactions
This process helps the system recalculate touch coordinates, which may correct minor alignment errors.
Restart the Device After Calibration
After performing touchscreen calibration, it is recommended to restart the device. Restarting ensures that the system reloads the touch input configuration and driver settings properly.
A reboot also clears temporary processes that may interfere with touchscreen performance.
Once the phone restarts, repeat the touchscreen test to confirm whether accuracy and responsiveness have improved.
Identify When Hardware Repair Is Needed
If touchscreen testing repeatedly shows dead zones or inaccurate touch detection, the issue may involve physical problems with the digitizer layer.
Common hardware-related symptoms include:
• certain areas never responding to touch
• ghost touches appearing randomly
• inconsistent multi-touch detection
• touchscreen accuracy worsening over time
In these situations, calibration will not permanently fix the problem because the hardware itself may be damaged.
Why Touchscreen Testing Is Important
Regular touchscreen testing helps identify problems before they become serious usability issues. Detecting sensitivity problems early allows users to perform calibration, software updates, or preventive maintenance before the screen becomes difficult to operate.
Keeping the touchscreen properly calibrated ensures accurate navigation, smoother typing, and a better overall smartphone experience.
Common Causes of Android Touchscreen Problems and How to Prevent Them
Direct Answer:
Android touchscreen problems usually occur due to software glitches, overloaded system resources, damaged screen protectors, moisture exposure, outdated firmware, or hardware issues with the digitizer. Understanding the root cause is essential because each type of problem requires a different solution. By identifying these causes early and applying preventive measures, users can maintain a smooth and responsive touchscreen experience.
Modern smartphones rely on a combination of hardware sensors and Android’s touch input system to process taps, swipes, and gestures. When either the software or the physical touchscreen components malfunction, the device may show symptoms such as delayed responses, ghost touches, unresponsive areas, or complete touchscreen failure.
Below are the most common causes of Android touchscreen issues and practical ways to prevent them.
Software Glitches and System Bugs
Temporary software glitches are one of the most frequent causes of touchscreen problems. When the operating system experiences bugs, memory conflicts, or overloaded processes, the phone may fail to register touch input correctly.
These issues often appear after:
• installing new applications
• running too many background processes
• system crashes or temporary errors
Prevention tips:
• restart the phone regularly
• keep the operating system updated
• uninstall unnecessary or problematic apps
• clear cached data periodically
Keeping the system clean and optimized helps Android process touch input more efficiently.
Excessive Background Applications
Running too many applications simultaneously can overload the device’s CPU and RAM, which may slow down touchscreen response time. When the system struggles to manage multiple processes, touch inputs may become delayed or inconsistent.
Signs of this issue include:
• slow scrolling
• lag while typing
• delayed app response
Prevention tips:
• close unused apps from the recent apps menu
• avoid installing unnecessary background services
• periodically restart the device to refresh system memory
Managing system resources properly improves both device performance and touchscreen responsiveness.
Screen Protector or Display Surface Issues
A poorly installed or low-quality screen protector can interfere with touch detection. Thick or damaged protectors sometimes reduce the sensitivity of the capacitive touchscreen.
Problems may include:
• taps not registering properly
• reduced swipe accuracy
• inconsistent touch sensitivity
Prevention tips:
• use high-quality tempered glass protectors
• ensure proper installation without air bubbles
• replace damaged or scratched protectors promptly
Maintaining a clean display surface ensures accurate touch detection.
Moisture, Dirt, or Oil on the Screen
Touchscreens rely on detecting electrical signals from your fingers. Water droplets, oil residue, or dust on the screen can disrupt these signals and cause the phone to misinterpret touches.
Users may experience:
• ghost touches
• delayed responses
• erratic scrolling
Prevention tips:
• clean the screen regularly with a microfiber cloth
• avoid using the phone with wet hands
• protect the device from rain or excessive humidity
Keeping the screen dry and clean helps the touchscreen sensors function correctly.
Outdated Software and Firmware
Old software versions may contain bugs affecting touchscreen drivers. Manufacturers release updates to improve system stability, optimize performance, and fix hardware compatibility issues.
If updates are ignored for long periods, users may encounter touch sensitivity problems.
Prevention tips:
- Open Settings
- Navigate to Software Update
- Install the latest available updates
Updating the device ensures that the phone benefits from the newest touch optimization improvements and bug fixes.
Physical Damage to the Touchscreen Digitizer
Hardware damage is the most serious cause of touchscreen problems. The digitizer layer, located beneath the display glass, is responsible for detecting touch input. If it becomes damaged due to drops, pressure, or liquid exposure, the screen may stop responding.
Common hardware symptoms include:
• dead zones on the screen
• random ghost touches
• touch completely failing in certain areas
Prevention tips:
• use a protective phone case
• avoid dropping the device
• keep the phone away from water and extreme heat
If the digitizer is damaged, professional repair or screen replacement is usually required.
Why Understanding Touchscreen Problems Matters
Knowing the causes of touchscreen issues helps users diagnose problems quickly and apply the correct solution. Many touch problems are minor and can be fixed through simple maintenance, software updates, or system optimization.
By practicing proper smartphone care and following preventive measures, users can maintain accurate touch performance, faster response times, and a longer device lifespan.
How to Fix Android Touchscreen Not Responding
If your Android touchscreen is not responding, the issue is usually caused by temporary system glitches, screen interference, software conflicts, or hardware damage to the digitizer. In most cases, the problem can be fixed by restarting the device, cleaning the screen, removing accessories, updating the system, or testing the phone in safe mode.
When a touchscreen stops responding, the device may still be powered on but fail to register taps, swipes, or gestures. This can happen suddenly due to software crashes, overloaded memory, or external factors affecting touch detection.
Following the correct troubleshooting steps helps restore normal touchscreen functionality without causing additional damage.
Restart the Android Device
A simple restart can often fix temporary system errors that prevent the touchscreen from responding.
Restarting the phone helps:
• clear temporary memory errors
• reload the touchscreen drivers
• reset background processes
To restart the device:
- Press and hold the Power button
- Select Restart
- Wait for the system to reboot
After restarting, test the screen to see if touch input works normally again.
Clean the Screen and Remove External Obstructions
Touchscreens rely on accurate detection of electrical signals from your fingers. Dirt, oil, or moisture on the screen can block proper touch detection.
Steps to follow:
• wipe the screen using a soft microfiber cloth
• remove any screen protector or protective film
• ensure your hands are dry and clean
A clean display surface allows the touchscreen sensors to respond more accurately.
Disconnect Charger and Accessories
Faulty chargers or cables can sometimes create electrical interference, causing the touchscreen to stop responding.
To check this:
• unplug the charging cable
• remove connected accessories such as OTG devices or USB adapters
• test the touchscreen while the phone is running on battery power
If the screen starts working normally after unplugging the charger, replacing the charger may resolve the issue.
Start the Phone in Safe Mode
Some third-party apps can interfere with the Android touch input system. Safe Mode disables all downloaded apps and runs only the default system applications.
To boot into Safe Mode:
- Press and hold the Power button
- Tap and hold Power Off until Safe Mode appears
- Restart the device in Safe Mode
If the touchscreen works correctly in Safe Mode, a recently installed app may be causing the issue.
Check for Android System Updates
Outdated Android versions may contain bugs affecting touchscreen performance.
To update the system:
- Open Settings
- Go to Software Update
- Tap Download and Install
Installing the latest updates ensures the device receives touchscreen driver improvements and bug fixes.
Perform a Factory Reset (Final Software Solution)
If none of the previous solutions work, a factory reset may resolve deeper system corruption.
Important:
Always backup your important data before resetting the device.
Factory reset steps:
- Open Settings
- Go to System → Reset Options
- Select Erase All Data (Factory Reset)
This process restores the device to its original software state and removes any corrupted files affecting touch functionality.
Seek Professional Repair for Hardware Damage
If the touchscreen remains unresponsive after all troubleshooting steps, the issue may involve physical damage to the display or digitizer layer.
Possible hardware causes include:
• cracked or pressure-damaged screen
• liquid damage affecting internal sensors
• faulty touchscreen controller
• loose display connectors
In these cases, visiting a professional repair technician or replacing the screen may be necessary.
Final Tip for Reliable Touchscreen Performance
To keep your Android touchscreen functioning properly:
• keep the screen clean and dry
• avoid installing unnecessary apps
• protect the phone from drops
• regularly install system updates
These simple habits help maintain stable touch responsiveness and long-term device reliability.
FAQs
Q: What does fixing touchscreen issues & calibration on Android mean.?
Fixing touchscreen issues & calibration on Android refers to the process of troubleshooting touch-related problems and adjusting the screen’s sensitivity so it accurately registers taps, swipes, and gestures. When a touchscreen becomes misaligned or slow, calibration and troubleshooting methods help restore its normal functionality.
Q: Why does my Android touchscreen stop responding sometimes.?
An Android touchscreen may stop responding due to temporary system glitches, overloaded background processes, faulty apps, screen protectors, moisture on the screen, or outdated system software. In some cases, hardware damage to the display or digitizer can also cause touch issues.
Q: How can I calibrate my Android touchscreen.?
You can calibrate your Android touchscreen by using built-in diagnostic options (available on some devices) or by installing trusted touchscreen calibration apps from the Play Store. These tools guide you through tapping specific areas of the screen to adjust touch sensitivity and improve accuracy.
Q: Can a screen protector cause touchscreen problems.?
Yes, a low-quality or damaged screen protector can interfere with touch detection. Thick protectors, air bubbles, or dirt trapped underneath may prevent the screen from properly sensing your touch input. Removing or replacing the protector often resolves the issue.
Q: Does restarting the phone fix touchscreen issues.?
Yes, restarting the device can fix temporary software errors that affect touch responsiveness. A reboot clears temporary memory, refreshes system processes, and reloads touchscreen drivers, which may restore normal performance.
Q: How do I know if my touchscreen needs calibration?
Your touchscreen may need calibration if you notice inaccurate taps, delayed responses, ghost touches, or areas of the screen that do not respond correctly. These symptoms usually indicate that the touch sensitivity settings need adjustment.
Q: Do Android updates help fix touchscreen problems.?
Yes, Android system updates often include bug fixes, driver updates, and performance improvements that can resolve touchscreen problems. Keeping your device updated ensures better compatibility between the operating system and the touchscreen hardware.
Q: Can third-party apps cause touchscreen issues on Android.?
Some poorly optimized or conflicting apps can interfere with touchscreen functionality. Running your phone in Safe Mode helps identify whether a third-party app is causing the issue, because Safe Mode temporarily disables all installed apps.
Q: What should I do if touchscreen calibration does not work.?
If calibration does not fix the problem, try other troubleshooting steps such as cleaning the screen, removing accessories, updating the system, or performing a factory reset. If the issue still persists, the problem may be hardware related.
Q: When should I seek professional repair for touchscreen problems.?
You should consider professional repair if the screen is cracked, parts of the display remain unresponsive, or calibration and software fixes do not resolve the issue. In such cases, the touchscreen digitizer or display assembly may need replacement.
Conclusion
In modern smartphones, the touchscreen is one of the most important components for interacting with the device. When touch input becomes inaccurate, delayed, or unresponsive, it can significantly affect the overall user experience. Understanding the process of fixing touchscreen issues & calibration on Android helps users quickly diagnose and resolve many common touch-related problems without immediately seeking professional repair.
Most touchscreen issues are caused by simple factors such as software glitches, dirty screens, faulty accessories, outdated system updates, or interference from third-party apps. By performing basic troubleshooting steps like restarting the device, cleaning the display, removing screen protectors, updating Android software, and testing the phone in Safe Mode, many problems can be resolved quickly. These methods help restore proper communication between the touchscreen hardware and the operating system.
Touchscreen calibration also plays an important role in maintaining accurate touch sensitivity. When calibration tools reset the device’s touch parameters, they help improve responsiveness, eliminate ghost touches, and ensure taps register in the correct locations on the screen. This process can significantly enhance the performance of Android devices that experience inconsistent touch behavior.
However, if the problem persists even after performing troubleshooting and calibration, the issue may be related to physical damage such as a faulty digitizer, cracked display, or internal hardware failure. In such situations, professional repair or screen replacement may be required to fully restore functionality.
Overall, fixing touchscreen issues & calibration on Android is a practical process that combines proper device maintenance, software optimization, and accurate diagnostics. By following the right steps and maintaining the device carefully, users can ensure smoother touch performance, better responsiveness, and a longer lifespan for their Android smartphones.
Also Read:
- 20 ways | How To Fix Android Phone Touch Screen Problem |
- How to Calibrate iPhone 12 | Complete Step-by-Step Guide to Fix Issues & Boost Performance
- How to Calibrate Samsung Galaxy S22 Battery | 12 Proven Fixes Guide
- Fix iPhone 11 Touch Screen Not Working Fast
- How to Calibrate Samsung S22 | 30 Easy Ways
- 20 ways | How To Fix Android Phone Touch Screen Problem |
- How to Fix iPhone Phantom Touch
- 12 Powerful Steps | How to Reset Samsung S22 for Calibration
- Why Is My Samsung S22 Touch Not Working Properly | 6 Shocking Fixes Guide
- How to Calibrate Samsung S22 Screen | 12 Proven Fixes Guide
- How to Calibrate Screen Color & White Balance on Android Devices | Complete 2026 Accuracy Guide
- Fixing White Balance Issues on a Top-Tier Android Handset | Step-by-Step Guide 2026