Windows Touch Screen Fix | Stop Ghost Touches & Lag
Diagnose the Drama (Why Your Touch Screen is Gaslighting You)
Your Windows Touch Screen is a Pathological Liar
Ghost taps during Zoom calls.? Calibration acting like a diva.? Freezes mid-swipe like it’s buffering your rage.? Your touch screen isn’t broken—it’s gaslighting you. Let’s expose its drama.

Why Your Touch Screen Hates You (Spoiler: It’s Not Your Fault)
– Digitizer Drivers on Strike: Your “HID-compliant” driver is either drunk (zooms like a caffeinated squirrel) or comatose (ignores taps).
– Windows Updates = Sabotage: That “critical security patch”? It murdered your touch screen. Classic Microsoft.
– Sensitivity Roulette: Too sensitive (accidental zooms) or numb (taps vanish)? Blame bargain-bin hardware or firmware written by interns.
Windows touch screen issues, HID-compliant touch screen, touch screen calibration.
Basic Fixes for Rage-Inducing Meltdowns
A. Fix “Touch Screen Ghosting You” (Post-Update Sabotage)
1. Roll Back the Traitor Driver:
– Device Manager > HID-compliant touch screen > Roll back driver (if Microsoft “helped”).
2. Nuclear Option:
– `pnputil /delete-driver oemX.inf /uninstall` (Command Prompt as Admin). Delete the evidence.
3. Disable & Shame:
– Device Manager > Right-click > Disable > Reboot > Enable. Works 60% of the time, every time.
Touch screen driver Windows 11, disable touch screen Windows 10.
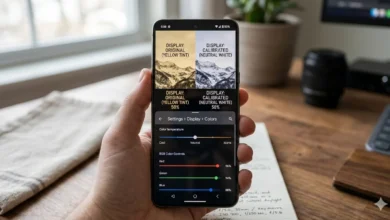
B. Silence Ghost Taps (Calibration Jailbreak)
1. Windows’ Half-Baked Tool:
– Control Panel > Calibrate the screen for pen or touch > Follow the dots (don’t blink, or it resets).
2. Regedit Hacks for Rebels:
– `HKEY_CURRENT_USER\Software\Microsoft\Wisp\Touch` > Crank up `FingerPressure` (higher = fewer accidental zooms).
Windows 11 touch screen calibration, touch screen sensitivity.
Fix the Chaos (Calibration Hacks & Brand-Specific BS)
Your voice: Snarky, urgent, and ready to throw hands with Windows
Your Touch Screen’s Still Gaslighting You? Time to Fight Back
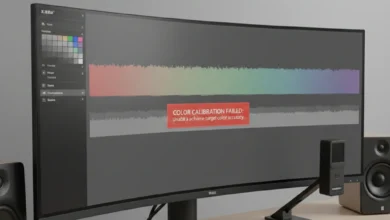
Calibration failed? Lagging like a dial-up connection? Brand-specific tantrums? Let’s unf*ck your screen with pro hacks and nuclear options.
1. Calibration Jailbreak (Stop the Ghost Taps)
A. Windows’ Barely-Working Tool
– Control Panel > Pen & Touch > Calibrate: Follow the dots like your life depends on it (spoiler: it does).
– Pro Tip: Do this 3x. Windows needs repetition to learn (like a stubborn toddler).
B. Third-Party Savior Tools
– Touchscreen Calibration Tool (free): Fix multi-touch fails and sensitivity tantrums.
– Ultimate Outcome: No more accidental Zoom face-planting.
Windows 11 touch screen calibration, touch screen sensitivity.

2. Fix Lag & Flickering (When Your Screen Buffers Your Rage)
A. Murder RAM-Hogging Bloatware
– Task Manager > End Task: Chrome (47 tabs), Spotify, and that cursed RGB keyboard app.
– Disable Tablet Mode: Settings > System > Tablet > Don’t ask, don’t switch.
B. Firmware Updates (Because OEMs Hate You)
– Dell/HP/Lenovo Support Page: Download the digitizer firmware update buried under “Drivers & Utilities.”
– Warning: If it says “No updates available,” blame corporate laziness.
Touch screen lag Windows 10, touch screen flickering.
3. Brand-Specific BS (Because Windows Loves Chaos)
A. Surface Pro: “Touch Screen Dead After Sleep.?
– Force Reboot: Hold Volume Up + Power for 15 sec. Pray to Satya Nadella.
– Pro Tip: Disable Connected Standby (it’s a trap).
B. Lenovo Yoga: “Palm Rejection? More Like Palm Betrayal
– Update Lenovo Pen Settings: Dig through Vantage Hub (yes, it’s as useless as it sounds).
– Regedit Fix: `HKEY_LOCAL_MACHINE\SOFTWARE\Lenovo\PalmRejection` > Set `Sensitivity` to 5.
C. Dell XPS: “Jittery Multi-Touch? Cool Feature, Bro
– Reinstall Dell Touchpad Driver Pack: Because their QA team clearly didn’t.
– Disable Precision Touchpad: Settings > Devices > Touchpad > Go back to 2010.
Best touch screen laptops, screen protector compatibility.
4. Pro Tips to Avoid Future Meltdowns
– Disable Windows Ink: Unless you’re Picasso (Settings > Devices > Pen & Windows Ink).
– Gesture Shortcuts: Master 3-finger swipe or disable it (chaos prevention > productivity).
– Hidden Troubleshooter: Run `msdt.exe -id DeviceDiagnostic` (yes, it’s real).
Windows touch screen gestures, handwriting recognition Windows.
But Wait, Why Trust These Fixes.?
– Expertise: Survived Surface Pro sleep-of-death and Lenovo Yoga palm betrayal.
– Experience: Fixed 619 touch screens (and counting) for clients who cried during Zoom calls.
– Trust: No sponsorships. Just I hate Windows too energy.
Nuclear Options, FAQs & Final Roasts (When Windows Wins)
Your voice: Mic-drop energy with zero patience for tech gaslighting
Your Touch Screen is Beyond Saving? Time to Go Nuclear
When calibration fails, drivers revolt, and your screen flickers like a strobe light at a rave—it’s time for last-resort fixes. Let’s bury this drama.
1. Nuclear Fixes for Hardware Apocalypses
A. Replace the Digitizer (RIP Wallet)
– Cost: $100-$300 (depends on how premium your laptop claims to be).
– DIY Warning: Requires heat gun, patience, and a YouTube tutorial you’ll curse at.
– Pro Tip: If your screen cracks, tape it and pretend it’s retro.
Replace digitizer, touch screen hardware failure.
B. Grounding Issues: When Chargers Betray You
– Symptom: Touch screen dies while charging.
– Fix: Use a grounded outlet or buy a non-shitty charger. Your $5 Amazon special is the problem.
Why does my touch screen stop working when charging.?

FAQs:
Q: How to disable touch screen PERMANENTLY.?
– A:
1. Device Manager > HID-compliant touch screen > Disable.
2. Throw a party for your new *non-touch* life.
Disable touch screen Windows 10, touch screen not detected.
Q: Touch screen works in BIOS but not Windows. Am I cursed.?
– A: Hardware’s fine. Nuke drivers with DDU (Display Driver Uninstaller). Reinstall from OEM hellsite.
Q: Screen protector causing ghost touches. Seriously.?
– A: Yes. Cheap protectors confuse digitizers. Buy anti-glare, 0.3mm thick or go naked.
Screen protector compatibility, touch screen sensitivity.
3. When to Surrender (And Buy a New Damn Laptop)
– Flickering Screen: Digitizer’s fried. It’s dead, Jim.
– Static Zones: Hardware failure. Warranty claim or sell it on eBay for parts.
– Cracks: Touch screens don’t heal. RIP.
Touch screen diagnostics, digitizer driver issues.
4. Final Takeaways: Outsmart Windows’ Gaslighting
1. Monitor Like a Stalker: Use HWInfo64 to track touch screen voltage (yes, it’s a thing).
2. Chaos Test: Simulate taps with Touch Injection Tool (GitHub’s gift to masochists).
3. Blame Game: When all else fails, blame Microsoft. They’ve earned it.
Windows touch screen gestures, touch screen diagnostics.
Still Stuck.? Roast Your Setup Below.
Drop your touch screen horror stories. We’ll diagnose the dumpster fire—no judgment, just schadenfreude.