Fixing White Balance Issues on a Top-Tier Android Handset | Step-by-Step Guide 2026
Fixing White Balance Issues on a Top-Tier Android Handset Complete Precision Guide
Fixing white balance issues on a top-tier Android handset starts with disabling Blue Light filters, switching to Natural display mode, updating firmware, and making small RGB adjustments only if necessary. In most cases, white balance problems are caused by software tuning not hardware defects.
Premium Android phones are designed with advanced OLED panels and intelligent color processing. However, even high-end devices can develop:
- Yellow or warm screen tint
- Green shift at low brightness
- Pink or magenta whites
- Inconsistent color across brightness levels
- Camera white balance inconsistencies
The key is controlled correction not aggressive adjustments.
In this guide, you’ll learn how to:
- Identify whether the issue is display or camera-related
- Correct tint safely without damaging color accuracy
- Use RGB sliders properly
- Prevent overcorrection
- Maintain natural, eye-friendly whites
Top-tier Android devices aim for color accuracy, not artificial brightness. When properly calibrated, whites should appear neutral, grays should stay gray, and skin tones should look realistic across all lighting conditions.
The goal isn’t “cooler” or “warmer.”
The goal is balanced, accurate color without distortion.
What Is the Best Way to Fix White Balance on a Phone?
The best way to fix white balance on a phone is to:
Disable Blue Light / Eye Comfort Mode
Switch to Natural or Standard display mode
Update device firmware
Test with a neutral white image
Make small RGB adjustments only if necessary
Avoid overcorrecting brightness or color temperature
This method prevents color distortion while maintaining accurate, natural whites.
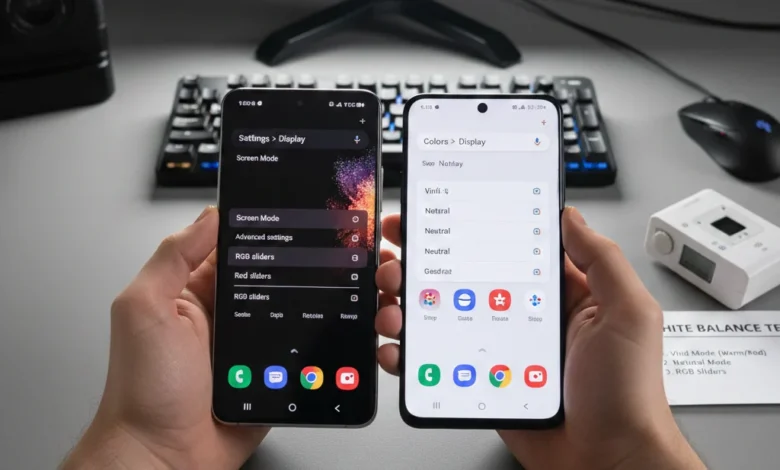
How to Access Display Settings on Android
Modern flagship devices like Galaxy S24+, Pixel 9, Sony Xperia 1 series, and other top-tier Android handsets provide deep display customization tools. But most users never go beyond brightness and dark mode. If your screen looks too yellowish, brownish, overly warm, has a red tint, or appears color inaccurate, the first step is accessing advanced display controls correctly.
White balance problems often stem from incorrect Screen Mode Settings (Vivid, Natural, Adaptive Display) or color temperature shifts caused by updates or accessibility filters. Many Galaxy S20/S21/S22/S23/S24+ red tint issues, Pixel 4/5/6/7/8/9 white balance bugs, and Sony Xperia color accuracy problems can be adjusted directly inside display settings before assuming hardware failure.
Navigating to Advanced Display Settings
On most Android flagships:
- Open Settings
- Tap Display
- Look for:
- Screen Mode
- Color Mode
- White Balance
- Advanced Display Settings
- Full screen color balance
- RGB sliders (Red, Green, Blue)
Samsung devices allow deeper calibration through:
Display → Screen Mode → Vivid → Advanced settings.
Sony Xperia provides:
Settings → Display → White Balance settings (manual RGB tuning).
Pixel devices use:
Settings → Display → Colors → Natural / Boosted / Adaptive.
If you’re troubleshooting yellowish display, red tint, or color temperature imbalance, this is your command center.
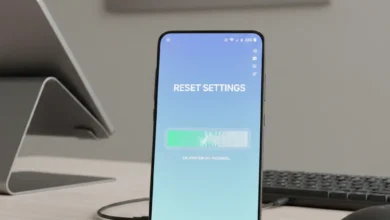
Resetting Display Settings Before Adjusting
Before manually tweaking RGB values:
- Disable Blue Light Filter / Night mode
- Turn off Extra Dim or Accessibility color filters
- Reset screen mode to default
- Remove third-party screen calibration apps
A factory defect vs software issue distinction begins here. If resetting display settings instantly fixes the tint, it’s software-based. If the tint persists across safe mode and diagnostics, deeper investigation is required.
Using Screen Mode to Fix Color Issues (Vivid vs Natural vs Adaptive Display)
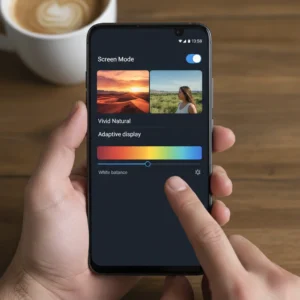
If your display looks too warm, slightly reddish, overly saturated, or washed out, the fastest way to start fixing it is by adjusting Screen Mode Settings. Every top-tier Android handset whether Galaxy S24+, Pixel 9, or Sony Xperia offers multiple color profiles that directly impact white balance adjustment and overall color temperature.
Screen modes are not just cosmetic presets. They modify display color calibration at a system level by changing gamma curves, color gamut mapping (sRGB vs DCI-P3), and tone processing. On OLED panels, this can exaggerate red tint or yellowish/brownish display issues. On LCD panels, it may reduce vibrancy but improve color accuracy.
Most white balance complaints come from users running Vivid mode at maximum saturation without realizing it pushes warm tones aggressively.
Understanding Vivid, Natural & Adaptive Display Modes
Vivid Mode
Vivid enhances saturation and contrast. It stretches colors closer to the DCI-P3 color space, making reds stronger and whites appear warmer. On Galaxy S20/S21/S22/S23/S24+ devices, Vivid mode combined with high brightness can amplify the well-known red tint issue.
Best for: Media consumption
Not ideal for: Color accuracy problems or white balance bugs
Natural Mode
Natural uses sRGB calibration for more realistic tones. Whites appear neutral instead of warm. If you’re experiencing a yellowish display or red tint fix is your goal, switching to Natural mode is often the quickest correction.
Best for: Accurate whites and reduced color temperature shifts
Adaptive Display
Adaptive display dynamically adjusts color based on lighting conditions. While useful, it can sometimes cause perceived white balance fluctuations. On some Pixel 4/5/6/7/8/9 devices, adaptive color behavior has triggered white balance bug complaints after updates.
If color shifts occur randomly, disable adaptive mode temporarily to test stability.
When Screen Mode Alone Solves the Problem
You should expect instant improvement if:
- Whites look too yellow in Vivid mode
- Reds appear oversaturated
- Photos look warmer than expected
- Display appears brownish at high brightness
Switching from Vivid to Natural resolves many Galaxy red tint issues without touching RGB sliders.
If tint persists even in Natural mode, then deeper display color calibration using manual adjustment steps is required.
OLED vs LCD Display Behavior
Understanding panel technology matters.
OLED Displays:
- Individual pixels emit light
- More prone to color temperature variation at low brightness
- Can show uneven red tint near edges
- Sensitive to calibration software changes
LCD Displays:
- Backlit panel
- More uniform whites
- Less dramatic saturation shifts
- Rarely suffer from strong red tint unless factory defect exists
Curved OLED displays (like some Galaxy Ultra models) may also show screen edge color balance variations, which we’ll address in a later section.
Signs It’s Not a Screen Mode Issue
Screen mode will not fix:
- Persistent discoloration in safe mode
- Physical burn-in
- Screen discoloration visible in bootloader
- Display diagnostics showing panel imbalance
- Factory defect confirmed via Samsung Members app
In these cases, tint correction via software update may not help — professional display calibration services or replacement may be required.
Adjusting White Balance via Sliders (Cool vs Warm) Practical Fix That Actually Works
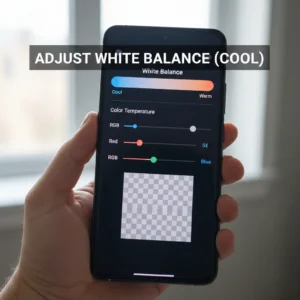
If switching screen modes didn’t fully solve the tint, this is where real control begins. Manual white balance adjustment through color temperature sliders and RGB sliders (Red, Green, Blue) allows you to fine-tune display color calibration instead of relying on presets.
On a top-tier Android handset like Galaxy S24+, Pixel 9, or Sony Xperia, white balance controls are built into Advanced Display Settings. These tools directly influence how your OLED or LCD panel renders neutral tones. When whites look yellowish/brownish, slightly pink, or too blue, the issue usually comes down to color temperature imbalance not necessarily a hardware defect.
Before assuming factory defect vs software issue, use this method carefully. Small adjustments make a big difference.
Cool vs Warm — What You’re Actually Changing
The Cool ↔ Warm slider modifies color temperature measured in Kelvin (K).
- Warm setting → Adds red/yellow tones (lower Kelvin value)
- Cool setting → Adds blue tones (higher Kelvin value)
If your screen shows:
- Red tint issue → Move slightly toward Cool
- Yellowish display → Move toward Cool gradually
- Bluish/washed look → Move slightly toward Warm
Do not drag the slider to extremes. Extreme cool settings can make whites appear icy and unnatural, hurting color accuracy.
The goal is neutral white not blue white.
Advanced RGB Sliders (Red, Green, Blue)
Many flagship models provide individual RGB sliders inside Advanced Display Settings. This is where you can precisely correct imbalance.
If you see red tint:
- Reduce Red slightly
- Increase Blue marginally
- Keep Green balanced
If display looks greenish:
- Reduce Green slightly
- Increase Red and Blue evenly
If whites look dull or brownish:
- Slightly increase Blue
- Slightly reduce Red
Adjust one slider at a time. Make micro changes. Observe white backgrounds (Settings menu works best). Avoid adjusting based on colorful images use neutral white screens.
Safe Testing Method for Accurate Adjustment
To avoid overcorrection:
- Disable Night mode / Blue light filter first
- Set brightness to 50–60%
- Open a white screen (Settings or blank browser page)
- Make minor RGB adjustments
- Lock changes and use phone normally for 10 minutes
Your eyes adapt quickly. What looks “fixed” instantly might feel off after extended use.
When Sliders Don’t Respond Properly
If RGB sliders:
- Reset automatically
- Don’t visibly change tone
- Revert after reboot
You may be facing a white balance bug caused by a software update. This has occurred on Pixel 4/5/6/7/8/9 devices and some Galaxy firmware builds.
In that case:
- Check for pending OS updates
- Clear system cache
- Use display diagnostics (Samsung Members app)
If tint appears even in boot mode, that indicates possible panel calibration drift or hardware imbalance.
OLED vs LCD Adjustment Differences
On OLED displays:
- Small RGB changes are more noticeable
- Edge tinting may persist due to panel uniformity limits
On LCD displays:
- Adjustments feel more subtle
- Whites may appear more stable across brightness levels
OLED panels can also shift slightly at low brightness. Always calibrate at mid-level brightness.
Quick Reality Check — What Manual Adjustment Cannot Fix
Manual white balance adjustment will not fix:
- Burn-in shadows
- Severe color banding
- Dead pixels
- Panel discoloration after drop
- Internal display cable damage
If tint remains in recovery mode or hardware test screen, it’s likely a factory defect vs software issue situation.
Manual color adjustment is the most powerful non-invasive way of fixing white balance issues on a top-tier Android handset without flashing firmware or replacing hardware. Done correctly, it restores neutral whites and balanced color temperature while preserving display accuracy.
Advanced Color Adjustment via RGB Values — Precision Calibration Without Overcorrecting
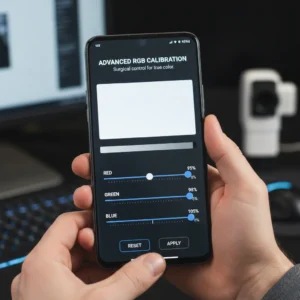
When basic white balance adjustment isn’t enough, advanced RGB calibration gives you surgical control over display color output. This is where you stop guessing and start correcting color accuracy problems properly. On a top-tier Android handset, RGB sliders directly influence how red, green, and blue subpixels combine to produce neutral whites and accurate tones.
Unlike simple cool vs warm adjusts, RGB tuning allows you to isolate the dominant color causing imbalance. This is especially useful for Galaxy S20/S21/S22/S23/S24+ red tint issues, Pixel white balance bugs, and subtle yellowish/brownish display shifts that presets cannot fully fix.
However, precision matters. Overcorrectmenting even one channel can cause unnatural skin tones, distorted photos, or eye strain. The goal is balance not dramatic visual change.
Understanding RGB Values in Display Color Calibration
Every pixel on your OLED or LCD panel combines:
- Red
- Green
- Blue
When these three values are equal, you get neutral white. When one channel dominates, tint appears.
Common imbalance patterns:
- Excess Red → Pink or red tint
- Low Blue → Warm yellowish tone
- Excess Green → Greenish whites
- Low Green → Magenta shift
Modern OLED displays are more sensitive to red oversaturation, especially in Vivid or Adaptive display mode. LCD panels typically show less aggressive shifts but may appear dull if calibration drifts.
Step-by-Step Precision Calibration Method
To avoid overcorrecting:
- Set screen mode to Natural
- Disable Night mode / Blue light filter
- Set brightness to 50%
- Open a plain white background
- Adjust one RGB slider at a time in small increments
Start by identifying the dominant tint. If the screen looks slightly pink, reduce Red by one small step. If whites look creamy or yellowish, increase Blue slightly.
After each adjustment:
- Lock the change
- Use your device for 5–10 minutes
- Re-check neutral backgrounds
Eyes adapt quickly. Always evaluate after short usage not instantly.
How OLED vs LCD Affects RGB Calibration
OLED Panels:
- Each pixel emits its own light
- Color shift is more noticeable at low brightness
- Slight RGB changes produce visible differences
- May show edge tint on curved displays
LCD Panels:
- Backlight-driven illumination
- More uniform whites
- RGB changes appear more subtle
- Less prone to dramatic red tint
If tint appears uneven across screen edges, it may relate to screen edge color balance rather than global RGB imbalance.
Identifying Software Bug vs Hardware Drift
If RGB sliders:
- Reset after restart
- Have no visible effect
- Produce inconsistent tone changes
You may be facing a firmware-level white balance bug. This has occurred in Pixel series updates and certain Samsung firmware builds. In these cases, tint correction via software update is more effective than manual tuning.
Signs of hardware-related color imbalance:
- Tint visible in bootloader mode
- Discoloration unaffected by reset display settings
- Persistent uneven tones across display
That’s when factory defect vs software issue evaluation becomes critical.
When to Stop Adjusting
Stop calibrating when:
- Whites look neutral under indoor lighting
- Skin tones appear natural in photos
- No eye strain after extended use
- No visible warm or cool cast on grey backgrounds
Do not chase “perfect white.” Every OLED and LCD panel has slight natural variance. Precision calibration means realistic balance not sterile lab-white.
Advanced RGB adjustment is one of the most effective non-invasive methods for fixing white balance issues on a top-tier Android handset. Done correctly, it restores color temperature accuracy, reduces tint, and prevents unnecessary display replacement.
Screen Edge Color Balance (For Curved Displays)
If you’re using a curved flagship like certain Galaxy Ultra models, you may notice something frustrating: the center of the screen looks neutral, but the edges appear slightly pink, greenish, or yellowish. This isn’t always a white balance adjustment failure it’s often a panel uniformity characteristic.
Curved OLED displays bend light emission across the edges. Because OLED pixels emit their own light, even tiny variations in voltage or subpixel aging can cause subtle edge tinting. Many Galaxy S20/S21/S22/S23/S24+ red tint issue reports specifically mention side discoloration under low brightness.
Before assuming factory defect vs software issue, you need to determine whether it’s true panel imbalance or viewing angle distortion.
Why Curved OLED Panels Show Edge Tint
OLED vs LCD display behavior differs significantly.
On OLED:
- Pixels at the curve sit at a slightly different viewing angle.
- Light emission spreads differently near edges.
- Calibration may appear uneven at low brightness.
On LCD:
- Backlighting reduces localized variation.
- Edge tint is much less common.
Edge tint becomes more visible:
- Under low brightness
- On grey backgrounds
- When viewing from slight angles
- In dark mode environments
This does not always mean defective hardware. Minor variation is within manufacturing tolerance.
How to Test for Real Edge Imbalance
To properly evaluate:
- Disable Blue Light Filter and Night mode color issues.
- Set brightness to 60%.
- Open a full white screen.
- Slowly tilt the phone.
- Observe whether tint shifts with angle.
If color changes with angle, it’s normal OLED behavior.
If tint remains fixed in specific areas regardless of angle, it may indicate calibration drift.
You can also use display diagnostics (Samsung Members app) to check panel uniformity.
Using Full Screen Color Balance Tools
Some Samsung devices offer:
- Full screen color balance
- Edge correction tuning
Inside Advanced Display Settings, you may see additional white balance adjustment options beyond basic RGB sliders.
If available:
- Reduce dominant tint slightly
- Avoid extreme shifts
- Re-check under multiple lighting conditions
Manual color adjustment steps should always be small and gradual. Overcompensation makes center whites inaccurate while trying to fix edges.
When It’s a Software Update Issue
Certain firmware updates have caused temporary edge calibration changes. Users reported red tint issues appearing after system upgrades.
If edge discoloration:
- Appeared suddenly after update
- Was not present before
- Is discussed widely in forums
Then tint correction via software update may resolve it. Always check for:
Settings → Software Update → Download and Install.
When Replacement Is the Only Real Fix
Edge imbalance may require hardware service if:
- Tint is visible even in bootloader
- Uneven patches appear under grey test screens
- Color banding accompanies tint
- Display diagnostics confirm abnormality
Professional display calibration services may help, but severe panel imbalance typically requires replacement.
Screen edge color balance issues are common on curved OLED flagships and do not automatically mean hardware failure. Careful testing, controlled white balance adjustment, and firmware checks should always come first before escalating.
Blue Light Filter Impact on White Balance
One of the most overlooked causes of color accuracy problems on a top-tier Android handset is the Blue Light Filter also called Night mode, Eye Comfort Shield, or Comfort View depending on the manufacturer. Many users think they’re dealing with a red tint issue, yellowish/brownish display, or even a factory defect vs software issue, when in reality the system is intentionally shifting color temperature to warmer tones.
Blue light filtering reduces short-wavelength blue light emission to minimize eye strain at night. To do this, the system overlays a warm tint across the display. That warmth directly affects white balance adjustment, making whites appear creamy, yellow, or even slightly orange.
Before attempting advanced display color calibration or RGB sliders (Red, Green, Blue), always verify whether Blue Light Filter is active.
How Blue Light Filter Alters Color Temperature
When enabled, the feature:
- Lowers blue channel output
- Increases red and green dominance
- Reduces overall cool tone balance
- Shifts color temperature toward warm spectrum
This shift can mimic:
- Galaxy S20/S21/S22/S23/S24+ red tint issue
- Pixel 4/5/6/7/8/9 white balance bug
- Yellowish display complaints
- Brownish whites under low brightness
The effect is more pronounced on OLED vs LCD display behavior because OLED panels render warmer overlays more vividly.
If your display looks fine during daytime but overly warm at night, scheduled Night mode color issues are likely the cause.
How to Disable and Test Properly
To verify:
- Go to Settings → Display
- Tap Blue Light Filter / Night mode / Eye Comfort Shield
- Turn it off completely
- Disable scheduling temporarily
- Set brightness to 50–60%
- Re-check white screen
If the tint disappears instantly, the issue was not calibration — it was a system overlay.
Some devices also allow adjusting intensity. Lowering the strength may restore acceptable balance without disabling it entirely.
Interaction with Screen Mode Settings
Blue Light Filter behaves differently across:
- Vivid mode
- Natural mode
- Adaptive display mode
In Vivid mode, warmth appears exaggerated. In Natural mode, the shift looks more controlled. Adaptive display mode may dynamically combine environmental lighting adjustments with the filter, making the display appear inconsistent.
If you’re fixing white balance issues on a top-tier Android handset, always disable adaptive display mode temporarily while testing.
When Blue Light Filter Causes False Calibration Adjustments
A common mistake:
Users manually reduce red via RGB sliders while Night mode is active. Later, when Night mode turns off automatically, the screen appears bluish or washed out.
This creates confusion and unnecessary overcorrection.
Proper order of adjustment:
- Disable Blue Light Filter
- Confirm baseline color
- Adjust white balance
- Re-enable filter if desired
- Fine-tune intensity only
Never calibrate while Night mode is active.
When It’s Not Just Blue Light Filter
If warmth persists even after disabling:
- Reset display settings
- Check for tint correction via software update
- Test in safe mode
- Use display diagnostics (Samsung Members app)
Persistent tint visible in boot mode may suggest panel calibration drift instead of filter overlay.
Blue Light Filter is designed for comfort, not color accuracy. It intentionally changes color temperature, and in many cases, it is the hidden cause behind perceived white balance bugs. Eliminating this variable first saves time and prevents unnecessary manual color adjustment steps.
White Balance Bugs in Camera Apps (e.g., Pixel 9)
Sometimes the problem isn’t your display at all it’s the camera processing pipeline. Many users reporting Pixel 4/5/6/7/8/9 white balance bug issues initially believed they had screen calibration problems. In reality, the camera app was applying inconsistent white balance algorithms during image processing.
Modern flagship cameras rely heavily on computational photography. AI-based auto white balance can misinterpret mixed lighting conditions, resulting in:
- Overly warm indoor photos
- Greenish fluorescent tint
- Pink skin tones
- Brownish highlights
- Inconsistent color temperature between shots
This can look like a display color calibration problem when viewing photos immediately after capture.
Before adjusting RGB sliders or screen mode settings, confirm whether the issue exists only inside the camera app.
How Camera White Balance Bugs Happen
Camera apps analyze lighting using sensor data and AI models. Under certain conditions especially mixed LED + natural light algorithms may overcompensate.
Common triggers:
- Indoor tungsten lighting
- Mixed daylight and artificial light
- HDR processing errors
- Recent firmware update
- Third-party camera app compatibility with screen modes
Pixel devices, especially during early software builds, have shown inconsistent tint correction via software update fixes.
If photos look warm inside the camera preview but normal in gallery apps, it’s likely a processing glitch not display imbalance.
Quick Test to Separate Display vs Camera Issue
To isolate the problem:
- Take a photo of a white surface.
- View it in:
- Default Gallery
- Google Photos
- A third-party photo editing app
- Compare it on another device.
If the image appears normal on another phone, your display is fine.
If it appears warm everywhere, the camera’s white balance processing caused it.
Using Manual White Balance Controls
Some flagship devices allow manual white balance adjustment inside Pro Mode.
In Pro Mode:
- Adjust Kelvin value manually
- Lower Kelvin for cooler tones
- Increase Kelvin for warmer tones
This bypasses aggressive AI adjustments and gives consistent results under controlled lighting.
If Pixel auto white balance appears unstable, switching to manual temperature in supported modes often solves it immediately.
Using RAW Photos to Bypass White Balance Errors
Shooting in RAW format avoids baked-in white balance. RAW files store sensor data without final color processing.
Advantages:
- Full correction in editing apps
- No permanent tint
- Higher color accuracy control
If white balance bugs appear frequently, RAW capture is the safest method for professionals or content creators who demand accurate color reproduction.
When a Software Update Is the Real Fix
If camera tint:
- Appeared after a firmware update
- Is reported widely by other users
- Affects multiple lighting conditions
Then tint correction via software update is the proper solution. Avoid adjusting display calibration for a camera algorithm issue.
Check:
Settings → Software Update → Install latest patch.
Camera white balance bugs can easily be mistaken for display color imbalance. Always separate camera processing from screen calibration before modifying advanced display settings. This prevents unnecessary RGB changes and protects overall display accuracy.
Using RAW Photos to Bypass White Balance Errors
If you’re serious about color accuracy and tired of inconsistent tones caused by automatic processing, shooting in RAW is one of the most powerful solutions available on a top-tier Android handset. Unlike standard JPEG images, RAW photos store unprocessed sensor data. That means white balance isn’t permanently baked into the image.
When dealing with Pixel 4/5/6/7/8/9 white balance bug reports or inconsistent auto-processing in mixed lighting, RAW capture gives you full post-processing control. Instead of relying on camera algorithms that may misjudge color temperature, you manually correct tones during editing.
This approach is especially useful when you’re unsure whether you’re facing:
- Camera white balance bug
- Display color calibration issue
- Red tint fix scenario
- Yellowish/brownish display perception
RAW removes the guesswork because you control the final white balance adjustment yourself.
Why RAW Files Avoid Permanent White Balance Errors
JPEG images:
- Apply auto white balance instantly
- Compress color data
- Lock in temperature adjustments
- Reduce editing flexibility
RAW files:
- Preserve full RGB sensor data
- Allow manual Kelvin adjustments
- Maintain dynamic range
- Enable precise tint correction via software
If your phone’s camera over-warms indoor photos or shifts tones unpredictably, RAW lets you correct color temperature without degrading image quality.
How to Enable RAW Capture
On most flagship Android devices:
- Open Camera app
- Switch to Pro Mode
- Enable RAW / DNG format
- Capture image
- Edit in professional photo editing apps
Popular editing apps allow:
- Kelvin temperature adjustment
- Tint slider correction
- RGB balance refinement
- Shadow and highlight tuning
This completely bypasses AI miscalculations.
How RAW Helps Diagnose Display vs Camera Issues
Here’s the practical diagnostic advantage:
- Shoot a white object in RAW.
- Open the RAW file in a photo editor.
- Adjust white balance manually.
- View the image on another calibrated display.
If corrected image looks accurate on multiple devices, your display calibration is likely fine. If it still appears tinted on your device only, then display color imbalance may exist.
This method helps distinguish camera algorithm errors from OLED vs LCD display behavior differences.
When RAW Is Overkill
RAW capture may not be necessary if:
- You rarely edit photos
- The issue occurs only in preview
- A software update resolves camera tint
- Manual white balance adjustment in Pro Mode fixes it
RAW files also consume more storage and require editing time. For casual users, correcting camera app settings or installing firmware updates may be enough.
Professional Workflow Consideration
Content creators, photographers, and designers benefit most from RAW because:
- It preserves color accuracy
- Prevents permanent white balance shifts
- Allows precise RGB control
- Reduces reliance on automated AI adjustments
If consistent color reproduction matters to you, RAW is not just a feature it’s protection against unpredictable white balance bugs.
Using RAW photos is one of the most reliable ways to bypass white balance errors at the camera level, ensuring that color issues are corrected intelligently rather than masked by display adjustments.
Manufacturer-Specific Fixes (Samsung, Sony, Google)
Not all white balance or color calibration issues behave the same way across devices. Each manufacturer uses its own display tuning, camera processing engine, and software optimization layer. That means a fix that works on one phone may not apply to another.
If you’re troubleshooting white balance inconsistencies, red tint issues, or camera color shifts, here’s how major brands handle them and what you should adjust first.
Samsung: Display & White Balance Fixes
Samsung devices use Dynamic AMOLED panels with aggressive color tuning by default.
Common Issues
- Over-saturated reds
- Warm indoor tone shifts
- Slight green tint at low brightness
- Edge color imbalance on curved displays
Fixes to Try
- Go to Settings → Display → Screen Mode
- Switch from Vivid to Natural
- Tap White Balance (available in Vivid mode)
- Adjust RGB sliders manually
- Reduce Red if screen looks warm
- Reduce Green if tint looks lime/greenish
For camera white balance:
- Use Pro Mode
- Manually adjust Kelvin temperature
- Disable Scene Optimizer if colors look exaggerated
Samsung also releases display tuning patches via firmware updates, so always install the latest software before manual calibration.
Sony: Creator Mode & Color Accuracy
Sony devices focus heavily on color accuracy, especially in Xperia flagship models.
Common Issues
- Slight blue tint in Standard mode
- Inconsistent camera auto white balance in mixed lighting
- Overcorrection in HDR scenes
Fixes to Try
- Enable Creator Mode
- Settings → Display → Image Quality Settings
- Turn off extra image enhancements
- Disable automatic white balance in Pro camera mode
- Manually set Kelvin values
Sony devices are generally factory-calibrated closer to professional color standards, so heavy RGB adjustments are rarely necessary.
Google (Pixel Series): AI Processing & White Balance Bugs
Pixel phones rely heavily on AI-based computational photography.
Common Issues
- Warm indoor tone bias
- Pink skin tones
- Yellowish whites
- Preview vs final photo mismatch
- White balance shifts after update
Fixes to Try
- Clear Camera app cache
- Check for system update
- Switch to manual white balance (if available)
- Enable RAW capture for editing flexibility
Many Pixel color inconsistencies are algorithm-based rather than hardware-related. If tint issues appeared after a firmware update, a future patch often resolves them.
Avoid adjusting display RGB sliders unless you confirm the tint appears outside the camera app.
When It’s Display vs Camera (Brand-Specific Clue)
Here’s a quick differentiation tip:
- If UI elements (Settings menus, icons, white backgrounds) look tinted → Display calibration issue
- If only photos look tinted → Camera processing issue
- If preview differs from final photo → Software algorithm issue
Each manufacturer optimizes color differently, so always start with native display modes before using third-party calibration tools.
Safe Adjustment Order (Across All Brands)
Follow this sequence:
- Update firmware
- Reset display settings
- Switch to natural/standard color mode
- Disable aggressive AI enhancements
- Use manual white balance
- Shoot RAW if needed
- Adjust RGB only as last resort
This prevents overcorrection and protects overall color accuracy.
Manufacturer-specific fixes are often simpler than advanced calibration. Understanding how your brand handles display tuning and camera processing helps you apply the right correction without damaging color balance system-wide.
Preventing Overcorrection — How to Maintain Natural White Balance
Fixing white balance is important but overcorrecting it can create bigger problems than the original tint. Many users reduce red too much, increase blue excessively, or aggressively tweak RGB sliders, only to end up with cold, washed-out, or unnatural skin tones.
If your goal is accurate whites without destroying color harmony, follow a controlled, user-first calibration strategy.
How Do I Know If My Screen Has a Tint Problem?
Your screen may have a tint issue if:
Whites look yellow, green, or pink
Gray backgrounds appear colored
Skin tones look unnatural
Color shifts at low brightness
Always compare across brightness levels before making adjustments.
Why Overcorrection Happens
Overcorrection usually occurs when users:
- Adjust RGB sliders without a reference image
- Fix color at maximum brightness only
- Ignore ambient lighting conditions
- Calibrate while Blue Light Filter is active
- Confuse camera processing with display calibration
White balance should look neutral not icy blue or artificially warm.
Step-by-Step Method to Maintain Natural White Balance
Use a Neutral Reference
Always calibrate using:
- A pure white image
- A gray background
- A trusted color test pattern
Avoid calibrating using colorful wallpapers or photos.
Adjust in Small Increments
If your device supports RGB controls:
- Change one slider at a time
- Adjust by 1–2 points only
- Re-evaluate before making additional changes
Large adjustments often create secondary color imbalances.
Test at Multiple Brightness Levels
Some displays shift tint at:
- Low brightness (green/gray bias)
- High brightness (warm shift)
Check color at:
- 30% brightness
- 60% brightness
- 100% brightness
Your calibration should look natural across all levels.
Turn Off Blue Light Filter Before Calibration
Blue Light / Night Mode changes white balance intentionally. If it’s active, you’ll miscalibrate your display.
Disable:
- Eye Comfort Mode
- Night Shift equivalent
- Reading mode
Calibrate first then re-enable comfort settings if needed.
Avoid “Pure White Obsession”
Displays are not paper. A slight warmth is normal and easier on the eyes. Overcooling a display may:
- Cause eye strain
- Make skin tones look lifeless
- Distort reds and oranges
- Reduce viewing comfort at night
Natural white balance should feel neutral not clinical.
Camera White Balance — Avoid Overprocessing
If you’re fixing photo tint issues:
- Avoid stacking filters
- Don’t combine heavy HDR + manual tint shifts
- Compare edited photo on another calibrated device
If you’re using RAW editing, adjust:
- Temperature first
- Tint second
- Exposure last
Maintaining this order prevents color shifts from cascading.
Best Practices for Sustainable Calibration
For long-term color accuracy:
- Update firmware regularly
- Avoid third-party “color booster” apps
- Stick to manufacturer display modes (Natural / Standard)
- Recalibrate only if you notice real change
Frequent unnecessary adjustments increase the risk of imbalance.
Signs You’ve Overcorrected
You may have gone too far if:
- Whites look blue under indoor lighting
- Skin tones appear gray
- Reds look dull
- Grays have a purple tint
- Your eyes feel strained quickly
If that happens:
- Reset display settings
- Start fresh
- Make smaller adjustments
The Golden Rule of White Balance
Neutral > Extreme
Your display should:
- Show white without obvious tint
- Preserve skin tones naturally
- Maintain depth in shadows
- Avoid color dominance
Precision calibration is about subtle correction not dramatic change.
Final Takeaway
The safest way to maintain natural white balance is controlled, minimal adjustment with proper reference testing. Whether you’re troubleshooting display tint, camera color shift, or brand-specific calibration differences, patience and small corrections deliver the most accurate and comfortable results.
FAQs:
Q: Why does my phone screen look yellow or warm.?
A yellow tint is usually caused by:
- Blue Light Filter / Eye Comfort Mode
- Warm display color profile (Vivid mode bias)
- OLED panel temperature tuning
- Firmware color calibration changes
First, disable any night mode or eye comfort setting. Then switch your display to Natural/Standard mode before adjusting RGB sliders. Slight warmth is normal on modern OLED displays and often easier on the eyes.
Q: How do I fix a green tint on my display.?
Green tint typically appears:
- At low brightness levels
- On OLED screens
- After a software update
To fix it:
- Increase brightness slightly
- Switch to Natural color mode
- Adjust green slider down by 1–2 points (if available)
- Install latest firmware update
If the tint appears only at very low brightness, it may be panel behavior rather than a defect.
Q: Is white balance a hardware or software issue.?
It can be either.
Software-related signs:
- Tint started after update
- Only camera photos look off
- Preview differs from final image
Hardware-related signs:
- Persistent tint across all apps
- Uneven color near screen edges
- No change after reset
Most modern tint issues are software tuning, not hardware failure.
Q: Why do my photos look different from what I see in preview.?
This happens due to computational photography processing. Phones apply:
- HDR optimization
- AI tone mapping
- Automatic white balance correction
- Scene detection
If preview differs from final photo, try:
- Using Pro mode
- Manually setting white balance
- Capturing in RAW format
This reduces algorithm interference.
Q: Should I use RGB sliders to fix white balance.?
Only as a last step.
Adjusting RGB sliders:
- Affects the entire system
- Can distort other colors
- May cause overcorrection
Always:
- Switch to Natural mode
- Disable color enhancements
- Test under neutral lighting
- Make small incremental changes
Precision beats aggressive correction.
Q: Does Blue Light Filter affect white balance accuracy.?
Yes.
Blue Light / Night Mode intentionally warms your screen. Calibrating while it’s enabled will cause misadjustment.
Turn it off before calibrating. Re-enable after you finish adjustments.
Q: How can I test if my screen is properly calibrated.?
Use:
- A white test image
- A gray gradient
- Skin tone photos
- Multiple brightness levels
Your display is properly balanced if:
- White appears neutral
- Gray looks gray (not pink/green)
- Skin tones look natural
- No color dominates across brightness levels
Testing in both indoor and daylight conditions improves accuracy.
Q: Why does my screen look different from another phone of the same model.?
Display panels can vary slightly due to:
- Manufacturing tolerances
- Different batch calibration
- Software version differences
- Brightness settings
Minor variation is normal. Significant imbalance is not.
Q: When should I reset display settings.?
Reset if:
- You’ve adjusted RGB too much
- Whites look extreme (blue or orange)
- Eye strain increases
- Calibration feels inconsistent
Starting fresh often solves compounded adjustments.
Q: Is RAW photography necessary to fix white balance.?
Not for casual users.
RAW is helpful if:
- You want professional control
- You notice camera white balance bugs
- You edit photos frequently
For everyday users, adjusting camera settings and ensuring firmware is updated is usually enough.
Final Takeaway
Most white balance and tint issues are solvable without hardware repair. Start simple:
- Disable filters
- Switch to Natural mode
- Update firmware
- Make small adjustments
Natural, balanced color is achieved through subtle correction not extreme changes.
Conclusion:
Fixing white balance issues on a top-tier Android handset isn’t about chasing a colder white or forcing warmer tones until the screen “looks better.” It’s about restoring balance the kind that makes whites look neutral, grays stay gray, and skin tones appear natural in every lighting condition.
High-end Android devices are engineered for color accuracy. Their OLED panels, adaptive tone mapping, and AI image processing are designed to deliver realistic color not exaggerated brightness. So when something feels off, the solution is rarely extreme calibration. It’s usually a simple adjustment: disabling a blue light filter, switching to Natural mode, resetting display settings, or fine-tuning RGB values carefully and minimally.
The biggest mistake users make is overcorrection.
Pushing sliders too far, constantly switching color profiles, or trying to “perfect” white can create new problems washed-out tones, eye strain, or uneven contrast. Subtle corrections produce professional results. Aggressive adjustments create instability.
If your display now:
- Shows clean whites without yellow or green tint
- Maintains neutral grays at low brightness
- Preserves accurate skin tones in photos and videos
- Feels comfortable during extended use
Then your calibration is successful.
Remember, color perception also changes with environment. Indoor warm lighting, outdoor sunlight, and nighttime viewing all influence how white appears to your eyes. That’s why proper calibration focuses on consistency across brightness levels not just how the screen looks in one moment.
When fixing white balance issues on a top-tier Android handset, your goal isn’t to make the display look “cooler” or “brighter.” It’s to restore accurate color temperature, balanced tint, and natural visual harmony.
And if tint problems persist after careful adjustments, firmware updates, or resets, it may be time to consider panel uniformity issues or professional calibration tools especially if you rely on your device for photography, content creation, or color-sensitive work.
In the end, the best calibration is the one you don’t notice.
When the screen simply looks right comfortable, realistic, and consistent you’ve achieved true white balance.
Also Read:
- 20 ways | How To Fix Android Phone Touch Screen Problem |
- How to Calibrate iPhone 12 | Complete Step-by-Step Guide to Fix Issues & Boost Performance
- Fix iPhone 11 Pro Max Wireless Charging Isn’t Working | Powerful Guide
- How Do I Enable Wireless Charging on My iPhone 11 Pro Max | Easy Fix
- Does iPhone 11 Pro Max Have Wireless Charging | Amazing Guide
- Does iPhone 11 Have Wireless Charging.? | Great News!
- 5 Powerful Ways to Check | How Many Battery Cycles Your iPhone Has Gone Through
- Why iphone 12 Mini Battery Drains Fast | Proven Causes, Fixes, and Pro Tips for Longer Battery Life
- How to Extend iPhone 12 mini Battery Life | Direct Expert Answer
- The Fastest Way to Charge iPhone 12 Pro | Ultimate Guide
- How To Fix iPhone 12 Overheating Issue
- How To Maintain iPhone 12 Battery Health | Proven Guide
- How to Charge Your iPhone 12 Faster in 2025 | Best Secrets
- How to Calibrate Samsung S22 | 30 Easy Ways
- Why Is My Samsung S22 Touch Not Working Properly | 6 Shocking Fixes Guide
- How to Calibrate Samsung S22 Screen | 12 Proven Fixes Guide
- How to Calibrate Samsung Galaxy S22 Battery | 12 Proven Fixes Guide
- Battery Drain vs Battery Health | 4 Truths Android Users Must Know
- 12 Proven Ways | How To Fix Android Battery Problems Fast
- 12 Powerful Steps | How to Reset Samsung S22 for Calibration
- 6 Powerful Ways | How to Calibrate Compass on Samsung S22